Chicken wire is more than a foam alternative; it’s the permanent, reusable skeleton for a truly sustainable floral business.
- Mastering the ‘pillow’ technique provides the structural core for any vessel.
- A clear cleaning and storage workflow makes the system infinitely reusable and cost-effective.
Recommendation: Start by mastering chicken wire in vases, then integrate it with other eco-mechanics for complex designs.
For any floral designer committed to sustainability, the mountain of single-use plastics is a familiar, frustrating sight. Green floral foam, once a studio staple, now represents a significant environmental cost, crumbling into non-biodegradable dust and leaching chemicals. The search for alternatives often leads to a collection of disparate tools—kenzans, tape grids, and various natural-fiber wools. While each has its place, they often feel like temporary patches rather than a cohesive, professional system.
This is where many designers get stuck, viewing these tools as one-for-one replacements for a foam block. But what if the solution wasn’t just about finding another disposable medium? What if the key was to shift our entire mindset from disposable “filler” to a permanent, structural framework? This is the revolutionary potential of mastering chicken wire. It’s not just another alternative; it’s the key to building a reusable, adaptable, and robust skeletal system for your floral designs. It’s the foundation of a workflow that is not only eco-conscious but also professionally sound and economically savvy.
This guide will deconstruct the process of creating and maintaining this skeletal system. We will move beyond the simple “scrunch and stuff” method to explore the nuanced mechanics that turn a simple roll of wire into the most versatile tool in your zero-waste arsenal. From selecting the right material to building armatures for large-scale installations, you’ll learn how to build a practice founded on strength, reusability, and ecological integrity.
To help you navigate this comprehensive guide, we’ve broken down the core mechanics into a clear, step-by-step structure. The summary below outlines the key stages of mastering your new, reusable floral framework.
Summary: The Complete Guide to Reusable Chicken Wire Frameworks
- 25mm vs 50mm: Which Mesh Size Holds Stems Best?
- The Pillow Technique: How to Scrunch Wire for Maximum Grip?
- Tape Cross: How to Anchor Your Wire Pillow so It Doesn’t Pop Out?
- Plastic Coated vs Galvanized: Protecting Your Glass Vases
- Rust and Bacteria: How to Clean and Store Wire for Re-use?
- Softer Density: How to Secure Heavy Stems in Basalt Wool?
- Armature Building: How to Use Heavy Gauge Wire to Replace Foam?
- Agra-Wool vs Floral Foam: How to Transition to Eco-Friendly Bases?
25mm vs 50mm: Which Mesh Size Holds Stems Best?
The first decision in building your reusable skeleton is choosing the right “bones.” Chicken wire comes in various mesh sizes, typically 1-inch (approx. 25mm) and 2-inch (approx. 50mm) hexagonal openings. The choice is not arbitrary; it’s a strategic decision that dictates the grip and support your framework will offer. The smaller, 25mm mesh is the workhorse for most vase arrangements. Its tighter grid provides more contact points, offering a superior grip for both delicate stems and medium-weight flowers. It creates a dense matrix that prevents stems from shifting, which is critical for precise placement.
The larger, 50mm mesh, is better suited for grand-scale installations or when working with exceptionally thick, woody branches. While it offers less grip for finer stems, its wider openings are easier to penetrate with large-diameter material. However, for a versatile, reusable system, the 25mm mesh is almost always the superior starting point. Its density allows you to create the structure needed for a vast majority of designs.
Professional Application: Securing Heavy Stems
To provide maximum control, professional florists ensure that stems penetrate at least two layers of the wire mesh. An application demonstrated by the Mississippi State University Extension shows that a 1-inch separation between these layers is ideal. For particularly heavy stems like flowering branches, gladiolus, or protea, florists often use chicken wire as a top layer over other mechanics to provide this crucial, high-level support and lock everything in place.
Ultimately, the goal is to create a multi-layered grid. Regardless of the initial mesh size, the technique used to shape the wire is what truly determines its holding power.
The Pillow Technique: How to Scrunch Wire for Maximum Grip?
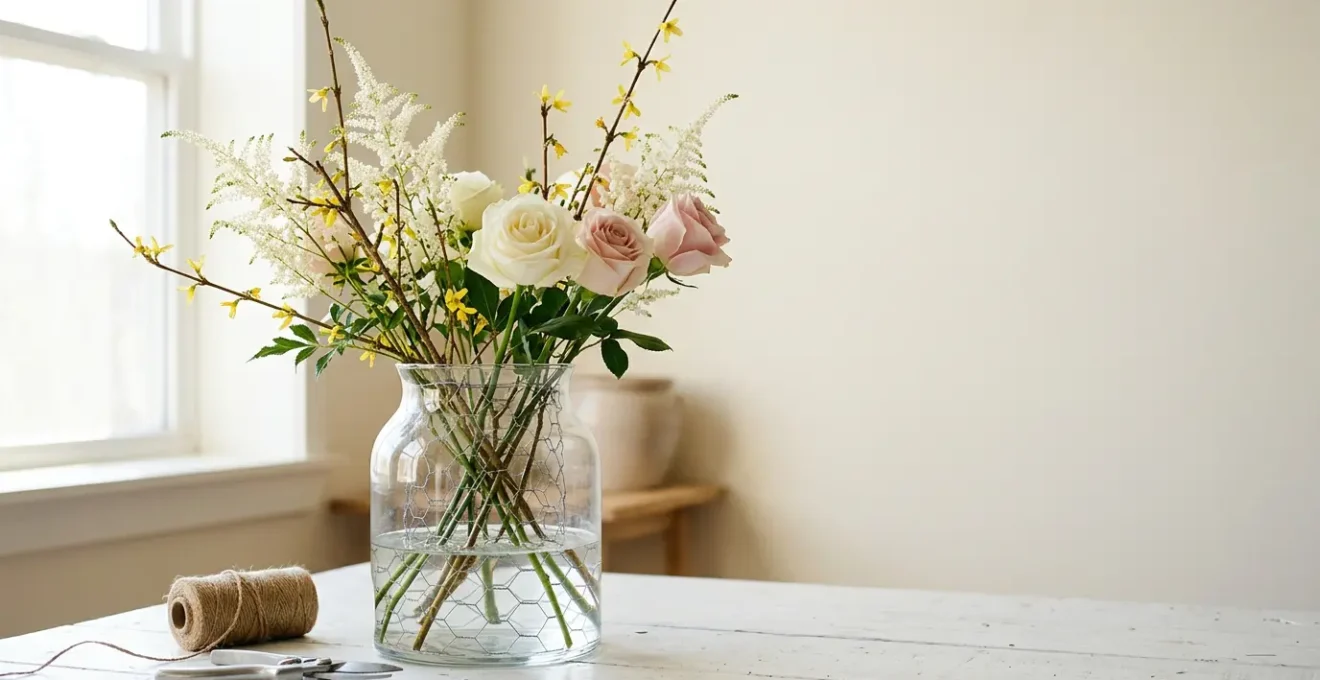
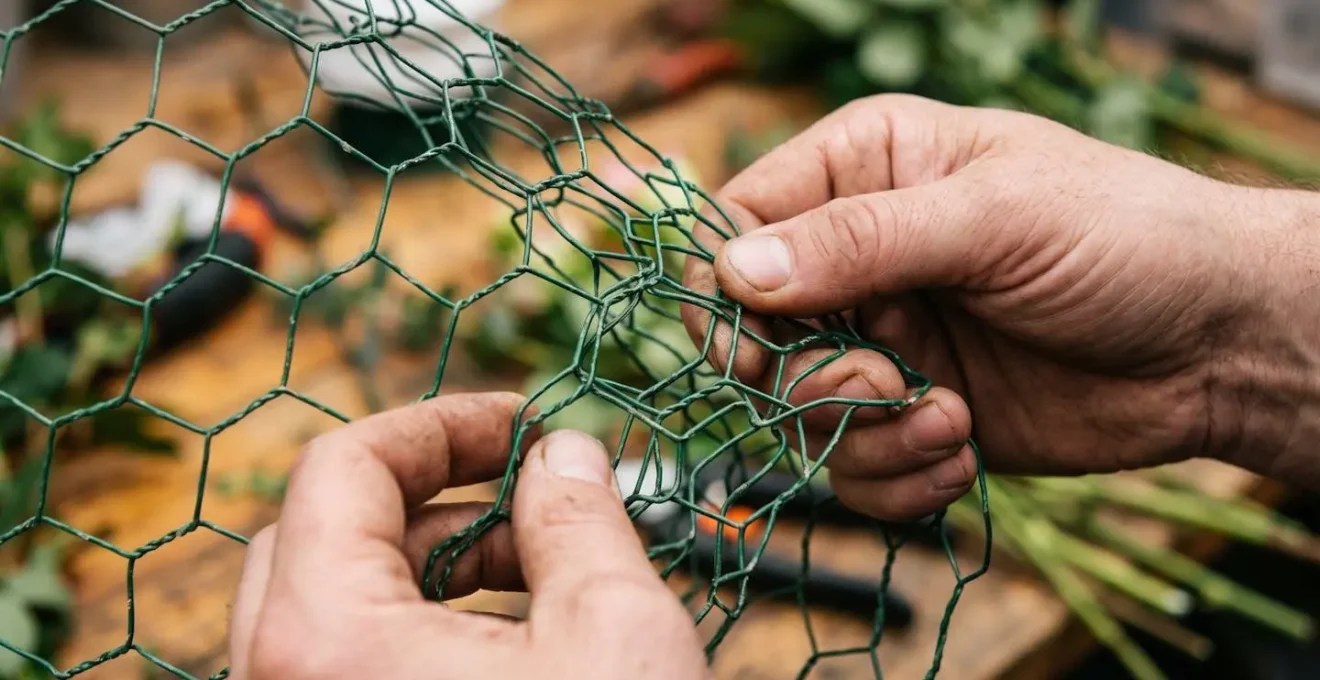
Simply stuffing a piece of wire into a vase is a recipe for frustration. The secret to unlocking its true potential lies in the “pillow” technique. This method isn’t about creating a random ball; it’s about constructing a multi-layered, three-dimensional grid with intentional zones of density. The goal is to build a self-supporting structure that grips stems with tension and precision, turning a flimsy material into a robust internal armature. This pillow is the heart of your reusable skeleton, and crafting it correctly is the most important skill to master.
The process involves folding a flat piece of wire back on itself multiple times before gently shaping it. This creates internal layers and voids, a network of hexagonal cells that stems can navigate and be held by. The finished pillow should be snug, fitting tightly against the vessel walls, and sit slightly proud of the vase rim to give you insertion points for downward-angled stems. Squeezing the finished form allows you to feel for weak spots or large gaps, which can then be reinforced by folding more wire into that area.
A well-made pillow has a denser core to provide an anchor for the main structural stems of your design, with slightly looser outer sections to accommodate more delicate filler flowers. This intentional variation in density gives you incredible control over your composition.
- Cut to Size: Start with a flat piece of wire, roughly 12-18 inches square, depending on the diameter of your vessel.
- Fold Layers: Fold the wire back on itself 2-3 times to create a multi-layered 3D grid.
- Form the Pillow: Scrunch the layered piece into a pillow shape that fits snugly inside the vase, ensuring it sits about half an inch above the lip.
- Test Integrity: Squeeze the pillow to identify and eliminate any weak spots or large voids before you begin designing.
- Reinforce: Consciously create a dense core for heavy stems while keeping outer areas looser for delicate insertions.
Tape Cross: How to Anchor Your Wire Pillow so It Doesn’t Pop Out?
A perfectly formed pillow is useless if it’s not securely anchored. As you add the weight of stems and water, an unsecured wire pillow can shift, compress, or even pop out of the vase, destroying your design. The solution is simple but non-negotiable: a tape cross, also known as a tape grid. Using waterproof floral tape, you create a structural harness that locks the wire pillow in place, ensuring it remains stable throughout the life of the arrangement.
The technique requires a completely dry vase rim for the tape to adhere properly. Start by placing one strip of tape across the center of the vase opening, securing it firmly to opposite sides of the rim. Then, place a second strip perpendicular to the first, creating a solid “cross” or “+” shape over the opening. For wider vases, you can add two more strips diagonally to create an asterisk shape, or even form a full grid (#) for maximum security. The tape should be taut, pressing down firmly on the top of the wire pillow.
This tape grid does more than just hold the pillow down; it acts as an additional structural element. The small squares or triangles created by the tape provide even more divisions for precise stem placement, especially at the top of the arrangement. It’s a simple, two-minute step that provides the critical stability your entire mechanical system needs to function. Skipping this step is the most common mistake beginners make, and it’s the one that most often leads to mechanical failure. A secure anchor is the difference between an amateur attempt and a professional, lasting design.
Plastic Coated vs Galvanized: Protecting Your Glass Vases
When working with glass vases, another practical consideration arises: protecting the vessel from scratches. This brings up the debate between two main types of chicken wire: plastic-coated and standard galvanized. Plastic-coated wire, typically green or black, has a layer of vinyl that provides a soft, protective barrier between the metal and the glass. This is the safest option for preserving the clarity and integrity of your expensive or delicate glass containers. It prevents the grating and scratching that can occur with bare metal wire, especially during the creation and transport of a design.
Beyond scratch protection, the coating also serves another vital function. Standard galvanized wire begins to rust when submerged in vase water, releasing particles that can shorten flower life and create a breeding ground for bacteria. The plastic coating seals the metal away from the water, maintaining a cleaner environment for your stems and extending the longevity of your arrangement. While galvanized wire is often cheaper, the dual benefits of vase protection and improved water quality make plastic-coated wire the superior choice for professional, reusable mechanics.
Pro Tip: The Hybrid Pillow Solution
To balance cost and performance, many professional florists use a clever hybrid method. They construct the dense inner core of the pillow using cheaper, structurally strong galvanized wire. Then, they wrap this core with an outer layer of plastic-coated wire. This approach provides full, scratch-proof protection where the mechanic touches the vase, while leveraging the cost-effectiveness and strength of galvanized wire in the center, where it doesn’t contact the glass or the bulk of the water.
This pragmatic solution shows how a deep understanding of materials can lead to more efficient and cost-effective workflows, without compromising on quality or the longevity of the design.
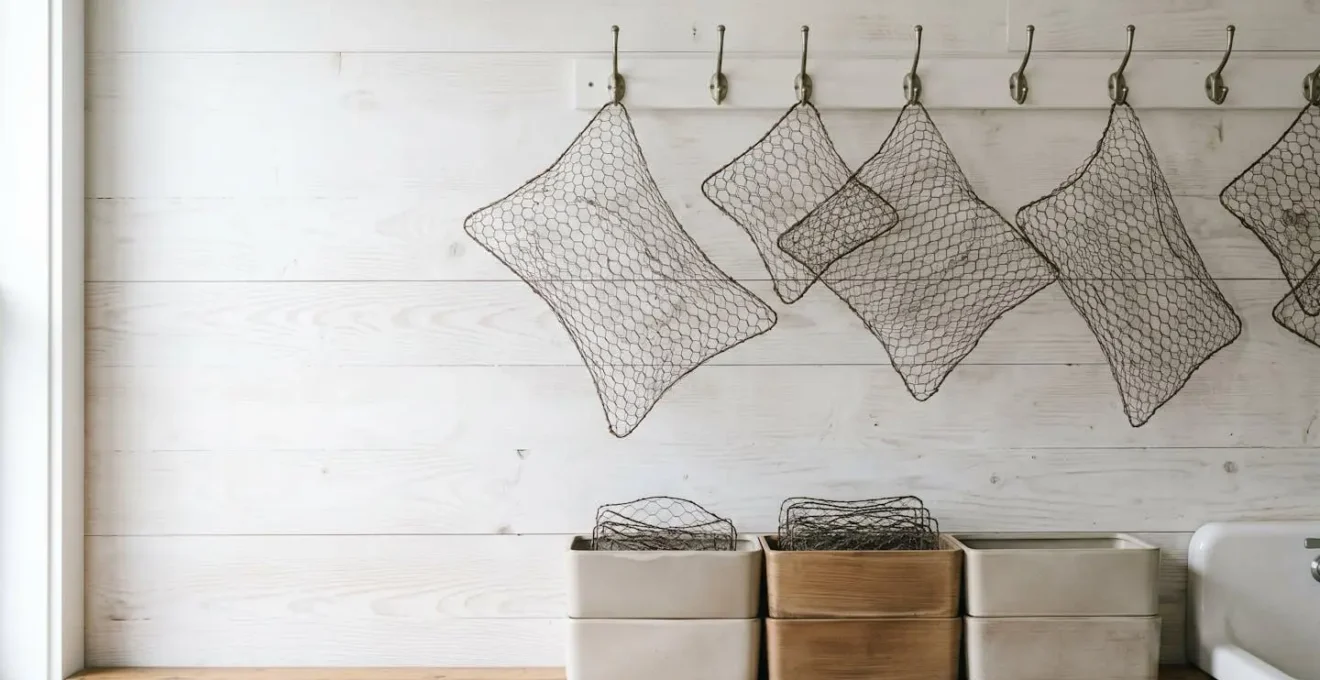
Rust and Bacteria: How to Clean and Store Wire for Re-use?
The true power of a chicken wire skeleton lies in its reusability. A single pillow can be used countless times, making it an incredibly cost-effective and environmentally friendly tool. However, this is only possible with a proper sanitation and storage workflow. After an event, the wire is full of plant debris and bacteria. Simply rinsing it is not enough; you need a system to thoroughly clean, dry, and store your mechanics to ensure they are ready and safe for the next use.
Chicken wire is reusable. While customers don’t typically return their containers and mechanics, florists do regularly collect their containers (and associated mechanics) after weddings and events.
– James M. DelPrince, PhD, AIFD, PFCI, Mississippi State University Extension Service
The cleaning process is about removing organic matter and killing pathogens. The most critical step, however, is drying. Wet wire, especially if it has any nicks in its plastic coating, will rust. Rapid air-drying is essential. Once clean and dry, an organized storage system saves immense time and effort. Instead of a tangled mess, your wire pillows become part of a grab-and-go library of tools.
A professional sanitation workflow makes reusability a seamless part of your studio practice:
- Vinegar Pre-Soak: Submerge used wire in a water and white vinegar solution. This helps kill bacteria and algae while neutralizing mineral deposits from tap water.
- Tumble and Shake: Vigorously agitate the wire in a bucket of clean water. This mechanical action is crucial for dislodging stubborn foliage and organic matter from the hexagonal openings.
- Rapid Air-Dry: Immediately after rinsing, shake out excess water and place the wire in a warm, dry area with good air circulation. Using a fan can dramatically speed up the process and prevent any flash rust from forming.
- Organize for Storage: Choose a system that works for your space. Popular methods include the “Hook Wall” for hanging pre-formed pillows, the “Flatten and File” method for storing collapsed pieces in labeled folders, or “Bin Stacking” pre-shaped pillows categorized by vase size.
Softer Density: How to Secure Heavy Stems in Basalt Wool?
While chicken wire is a versatile standalone mechanic, its true power as a “skeletal system” is revealed when it’s combined with other eco-friendly materials. Take basalt wool (like Agra-Wool), for example. This material offers phenomenal water retention, similar to floral foam, but it has a much softer, more fibrous density. While perfect for fine, delicate stems that need constant hydration, it struggles to support heavy or thick-stemmed flowers on its own. A heavy dahlia or a thick branch can easily tear through the wool or refuse to stay angled.
This is where the concept of an exoskeleton comes into play. Instead of trying to force the wool to do something it’s not designed for, you can wrap your block of saturated basalt wool with a cage of chicken wire. This external framework provides the structural integrity the wool lacks. You can scrunch a piece of wire around the wool block before placing it in the vase, or line the vase with a wire pillow and place the saturated wool inside it.
With this hybrid approach, you get the best of both worlds. The basalt wool provides the continuous water source needed for thirsty flowers, while the chicken wire exoskeleton provides the robust anchoring points for your heavy, structural stems. The heavy stems can be driven through the wool and securely lodged in the wire grid, held at any angle you desire. This allows you to build lush, full designs with a mix of heavy and delicate flowers, all within a completely foam-free and reusable mechanical base. The wire becomes the bones, and the wool becomes the supportive tissue.
Armature Building: How to Use Heavy Gauge Wire to Replace Foam?
Moving beyond vase arrangements, the skeletal concept of chicken wire mechanics truly shines in large-scale installations like floral arches, hanging clouds, and wall meadows. In these scenarios, floral foam has traditionally been used in cages, but this creates immense plastic waste and structural limitations. The sustainable, professional alternative is a custom-built armature, where chicken wire acts as the essential “connective tissue.”
The primary structure, or the “bones” of the installation, is built from a stronger, heavy-gauge wire or a metal frame. This provides the overall shape and load-bearing capacity. However, this heavy frame alone doesn’t offer enough insertion points for the hundreds of stems needed to flesh out the design. This is where chicken wire comes in. It is wrapped around, stitched onto, or suspended within the primary armature to create a fine, three-dimensional grid.
Large-Scale Installation Mechanics
In professional event floristry, chicken wire is indispensable for creating depth and volume. For a hanging installation, for example, a primary frame might be suspended from the ceiling. Chicken wire is then used to create multiple levels within this frame, allowing the florist to place stems at varying depths to build a design that feels lush and dimensional, rather than flat. The wire is securely attached to the main armature using finer wire, effectively stitching the “skin” of chicken wire onto the “skeleton” of the heavy frame.
This system creates thousands of secure insertion points, allowing for intricate layering of foliage and flowers. It is infinitely stronger, more adaptable, and completely reusable compared to a series of foam cages. The armature becomes a permanent asset in a floral event company’s inventory, ready to be skinned with chicken wire and brought to life again and again.
Key Takeaways
- Rethink chicken wire not as a foam alternative, but as the ‘skeletal system’ for a reusable design workflow.
- The ‘pillow technique’—creating a multi-layered, dense core—is the single most important skill for structural integrity.
- A strict cleaning and drying workflow is non-negotiable for making your mechanics a truly reusable, long-term asset.
Agra-Wool vs Floral Foam: How to Transition to Eco-Friendly Bases?
Embracing a foam-free practice can feel daunting, but it’s a change that clients and the market are increasingly demanding and willing to support. The shift is not just an ethical one; it’s a smart business move. Research shows a significant portion of consumers are ready to invest more in sustainable practices. For instance, research from Mississippi State and Texas State Universities found that 50% or more of consumers would pay at least 10% more for flowers with sustainable attributes. This trend is mirrored in larger market movements, as market analysis reveals that over 30% of flower buyers in the EU opted for certified sustainable flowers in 2024.
This consumer demand provides a powerful mandate to transition away from floral foam. The key is to approach the change not as an all-or-nothing leap, but as a phased evolution of your skills and toolkit. It’s not about throwing away every old habit overnight, but about strategically integrating new, sustainable mechanics into your workflow, starting with the most versatile and cost-effective: chicken wire. As you build confidence, you can then expand your repertoire to include other tools like Agra-Wool, pin frogs, and more for specialized applications.
Communicating this transition to your clients is crucial. Frame your use of sustainable mechanics not as a difficult compromise, but as a premium feature that reflects quality, care, and modern values. Your commitment to a reusable, foam-free workflow becomes a powerful part of your brand story—a story that a growing segment of the market is eager to buy into. This phased, strategic transition makes the journey to sustainability manageable, profitable, and creatively liberating.
Your Phased Transition Roadmap to Foam-Free Floristry
- Phase 1 – Master Chicken Wire in Vases: Begin with reusable wire mechanics for standard arrangements. This is the low-cost, high-impact gateway to foam-free floristry.
- Phase 2 – Hybrid Combinations: Integrate chicken wire with Agra-Wool for designs that need both the structural support of wire and the superior water retention of wool.
- Phase 3 – Specialized Applications: Deploy other mechanics like pin frogs (kenzans) or Agra-Wool alone for specific situations, such as shallow dishes or Ikenobo-style designs, where wire is unsuitable.
- Phase 4 – Client Education: Actively communicate your sustainable choices. Position your eco-friendly practices as a standard of quality and value, not a niche or costly upgrade.