Mastering floral wire isn’t about memorizing gauges; it’s about understanding structural engineering principles.
- Wire gauge is inverse: a low number (18g) is thick and strong for structure, while a high number (32g) is fine and flexible for delicate work.
- The technique (piercing, hairpin, stitching) and wire type (painted, annealed) must match the flower’s anatomy and the design’s environment (e.g., in water).
Recommendation: Stop seeing wire as a mere crutch and start using it as an intentional, invisible structural element to build ambitious, gravity-defying floral designs.
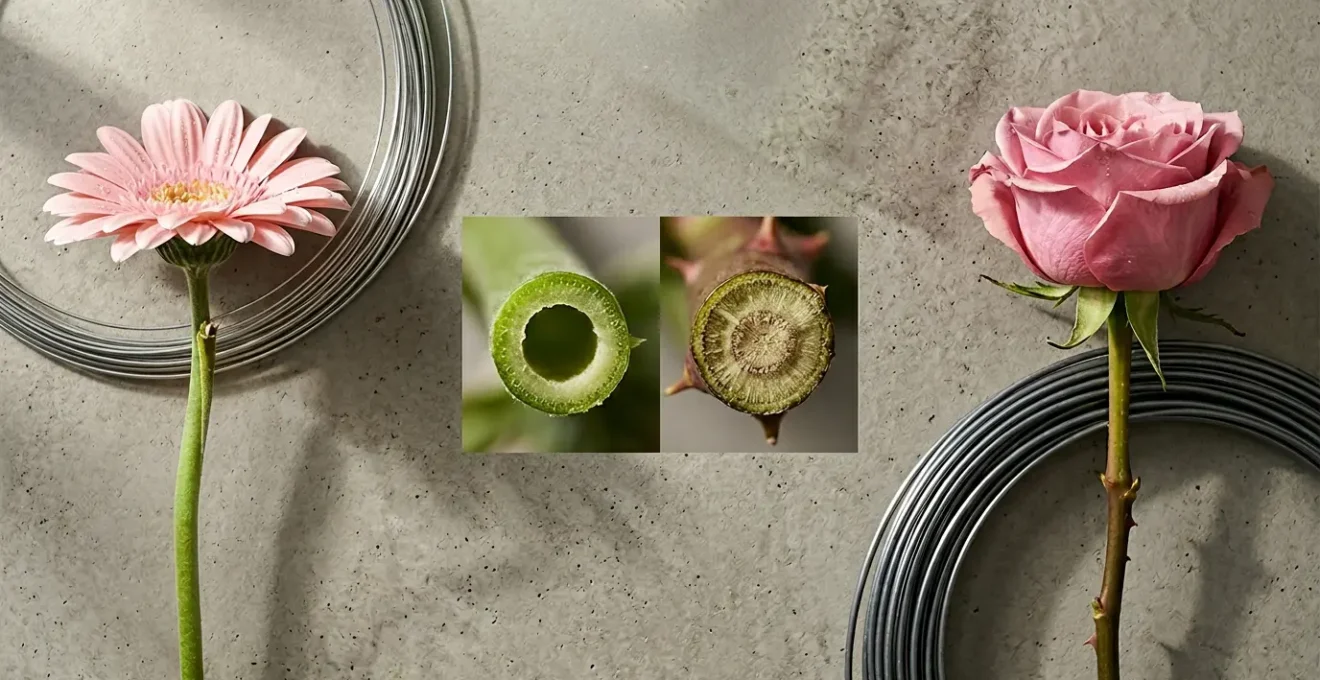
That spool of wire can feel like an enigma. You see the numbers—18, 22, 26, 32—and hear the vague advice: « use a thicker wire for heavier flowers. » But when you’re holding a delicate Gerbera with its notoriously weak neck, or a prized rose you can’t afford to damage, that advice feels dangerously incomplete. The fear of snapping a stem, piercing the wrong spot, or having a wire rust in a vase can be paralyzing. You’re left wondering if there’s a secret code to the gauge system that no one ever shared.
The truth is, many florists learn by trial and error, which often leads to over-reliance on one or two familiar gauges and techniques, limiting their creative potential. They treat wire as a last-resort fix, a necessary evil to prop up a weak stem. But this misses the point entirely. The most accomplished floral designers aren’t just flower arrangers; they are wirework artists and miniature structural engineers. They understand that wire isn’t just for support—it’s for control, for creating impossible shapes, and for building entire foam-free worlds.
This is your shift in perspective. Forget memorizing charts. We’re going to decode the principles of wirework, from the physics of load-bearing to the material science of rust prevention. This guide will take you from the fundamental techniques for a single bloom to the complex engineering required for gravity-defying floral clouds. You will learn to see wire not as a crutch, but as your most powerful tool for realizing your artistic vision with structural integrity.
This comprehensive guide explores the essential wiring techniques and structural considerations every florist should master. Discover how to choose the right method for each flower and build designs that are both beautiful and structurally sound.
Summary: The Floral Wirework Engineering Guide
- Internal vs External Wiring: When Should You Pierce the Calyx?
- Parafilm Stretch: How to Activate the Wax for a Smooth Finish?
- Armature Building: How to Use Heavy Gauge Wire to Replace Foam?
- Hook and Return: How to Ensure No Sharp Ends Scratch the Bride?
- Painted vs Annealed: Which Wire Won’t Rust inside a Wet Vase?
- Weight Loading: How Heavy Is a Wet Floral Cloud?
- Taping and Wiring: How to Put a Single Orchid Head in a Wedding Bouquet?
- How to Engineer Gravity-Defying Floral Clouds for Marquee Weddings?
Internal vs External Wiring: When Should You Pierce the Calyx?
The first decision in wiring a flower is fundamental: do you work from the inside out or the outside in? This isn’t a stylistic choice but a technical one based on the flower’s anatomy. The calyx—that green, leafy part at the base of the bloom—is your guide. For flowers with a firm, robust calyx and a fleshy head, like roses and carnations, the « pierce method » provides an incredibly strong, internal anchor point. By inserting the wire horizontally through the calyx, you create a new structural axis that takes the strain off the natural stem junction, the weakest point.
Conversely, for delicate flowers with no accessible calyx or a very fragile structure, such as orchids or delphiniums, piercing is destructive. Here, an external support is required. The « hairpin » or « hook » method involves creating a U-shaped hook with the wire, which is threaded through the flower’s center and pulled down. This cradles the bloom’s base without invasive piercing, distributing the load gently. The choice between internal and external wiring is the first step in applying the right engineering principle to the specific material—in this case, the flower itself.
- Pierce Method (Internal): Ideal for roses and carnations (Gauge 22-18). Pierce the calyx horizontally, leaving one side of the wire about a third of the length of the other. Bend both ends down to meet the stem.
- Insertion Method (Internal): A preventative support for sturdy but weak-necked stems like Gerberas (Gauge 22-18). Push the wire vertically up the stem and into the calyx just enough to lodge it firmly.
- Hairpin/Hook Method (External): Best for delicate flowers like orchids (Gauge 24-20). Bend the wire into a hairpin, thread both ends through the flower’s center, and pull until the hook is embedded.
- Cross Wiring Method (Internal): For the heaviest blooms like protea (Gauge 22-16). Pierce the base with one wire, then repeat with a second wire to form an ‘X’, completely replacing the stem’s load-bearing function.
Parafilm Stretch: How to Activate the Wax for a Smooth Finish?
Thinking of Parafilm as just « floral tape » is like calling a chef’s knife a butter knife. It’s a highly specialized material whose properties are only unlocked through correct technique. Parafilm is not adhesive in its resting state; the magic happens when you stretch it. This physical act of stretching does two things: it warms the wax impregnated in the paper and it thins the material, making it cling to itself and the wire. A properly stretched piece of Parafilm creates a seamless, watertight seal that looks like a natural extension of the stem.
The key is to apply tension. Hold the end of the tape against the stem with your thumb, and with your other hand, pull the tape as you wrap. You should feel it give and become slightly tacky. According to floral supply manufacturers, Parafilm’s stretchability can extend up to 4 times its original length, though a practical stretch is about double its length. Wrapping without stretching results in a bulky, uneven finish that can easily unravel. Mastering the stretch is what separates amateur wiring from a professional, invisible finish. It turns a collection of disparate parts—stem, wire, tape—into a single, cohesive unit.
When stretched, it becomes slightly tacky, creating an airtight yet breathable seal that locks in moisture while allowing gases to exchange.
– Horticultural experts, Tree Care Zone grafting and budding techniques analysis
The goal is to wrap at a steep downward angle, overlapping each layer by about half. This ensures complete coverage and a strong, self-adhering bond. A well-taped wire is smooth, has no bumps, and feels secure. It’s the final step in creating an artificial stem that is both structurally sound and aesthetically pleasing.
Armature Building: How to Use Heavy Gauge Wire to Replace Foam?
For decades, floral foam has been the default mechanic for arrangements. It’s quick, easy, and holds water. However, it’s also a single-use plastic, crumbles into microplastic dust, and offers limited structural integrity for ambitious designs. The modern floral engineer looks to a more sustainable and structurally superior alternative: the wire armature. Using heavy gauge wire (like 12-gauge or chicken wire), you can build a reusable, custom-fit framework that provides far greater design freedom and reliability.
Instead of stabbing stems into foam, you weave them into a wire mesh. This could be a ball of chicken wire secured in a vase or an elaborate grid built for a large-scale installation. This approach forces you to think about stem placement with intention. Each stem becomes part of the overall structure, locking its neighbors in place. The result is a design that is often more airy, natural, and dynamic. Furthermore, wire armatures are incredibly strong, allowing for the creation of overhead installations and « growing » arrangements that would be impossible with foam.
Case Study: The Foam-Free Emergency
A pivotal moment in the shift away from foam comes from a story by Jessica from Harmony Harvest Farm. During a crucial wedding setup, her pre-soaked floral foam bricks exploded, showering a white linen backdrop with green sludge minutes before the ceremony. In a high-pressure moment, she was forced to engineer an emergency solution using wire, creating an armature that replicated the foam’s function. As documented in a TeamFlower article on sustainable mechanics, this crisis became a catalyst. It proved that wire armatures not only work but provide superior structural reliability under pressure, leading her to adopt them permanently for all event work.
Building a wire armature is like creating a skeleton for your design. It is the foundational step that dictates the final shape and stability, transitioning your role from flower arranger to floral sculptor.
Hook and Return: How to Ensure No Sharp Ends Scratch the Bride?
A wired bouquet should be a thing of beauty and security, not a potential hazard. The single most important safety technique in bridal work is the « hook and return, » also known as a « shepherd’s crook. » After you’ve wired a stem and taped it, you are left with the end of the wire at the bottom of the new « stem. » A novice might simply snip it off, leaving a sharp, exposed point that can easily snag a delicate dress, or worse, scratch the person holding it. This is a mark of unprofessionalism.
The professional solution is simple and non-negotiable. Instead of cutting the wire flush, leave about half an inch (1-1.5 cm) of excess wire. Using your pliers, bend this excess piece back on itself, forming a small ‘U’ or hook. Then, press this hook tightly back against the main wire shaft. The sharp end is now safely tucked away, pointing back up into the taped stem. Finally, you give this hooked end one or two final wraps of Parafilm to completely encase it. This creates a smooth, rounded, snag-free finish at the end of every single wired element.
The bridal party might get out of line, but not your bouquet flowers.
– OASIS Floral Products Education Team, Why and How to Wire and Tape Flowers professional guide
This technique must become muscle memory. It should be applied to every single wire used in a bouquet, corsage, or boutonnière—any design that will be handled or worn. It is a small detail that speaks volumes about your craftsmanship, your attention to detail, and your care for the client. It’s the difference between an amateur piece and a work of professional floral art.
Painted vs Annealed: Which Wire Won’t Rust inside a Wet Vase?
Not all wires are created equal, especially when water is involved. Choosing the wrong type of wire for an in-vase arrangement can lead to disaster: rust leaching into the water, turning it a murky brown, and potentially staining the vase or even the flower stems. This comes down to understanding the material science of your wire.
The most common and cheapest wire you’ll find is annealed wire. It’s also known as « black annealed » or « oiled steel » wire. Annealing is a heat-treatment process that makes the steel softer and more pliable, but it offers zero protection against corrosion. The moment annealed wire touches water, the oxidation process begins. It is suitable only for dry mechanics, practice, or temporary structures that will not be exposed to moisture.
For any work that will be in a vase, submerged, or exposed to the elements, you must use a coated wire. Painted or enamel-coated wire provides a waterproof barrier that protects the steel core from rusting. This is your go-to for most wedding and event work. For the ultimate in rust protection, especially for long-term installations or very humid environments, galvanized wire is the top choice. The zinc coating on galvanized wire actively prevents rust through a sacrificial process, making it incredibly durable. Understanding these properties is crucial for the longevity and aesthetic integrity of your work.
The following table, based on an analysis from wire experts at Bekaert on galvanized vs. annealed wire, breaks down the key differences for floral applications.
| Wire Type | Corrosion Resistance | Water Exposure Suitability | Recommended Use | Cost Point |
|---|---|---|---|---|
| Annealed (Raw/Oiled Steel) | Minimal – will rust when exposed to moisture | Not suitable – rusts readily in water | Dry mechanics, practice work, temporary bindings | Most economical |
| Painted/Enamel-Coated Wire | Moderate – coating acts as waterproof barrier | Suitable for in-vase and wet arrangements | In-vase designs, bouquet work, wedding florals | Mid-range |
| Galvanized Wire (Zinc-Coated) | High – zinc coating prevents oxidation | Excellent for prolonged water exposure | Outdoor installations, long-term designs, humid environments | Premium |
| Paper-Covered Wire | Poor – paper disintegrates exposing steel underneath | Not suitable – paper absorbs water | Dry work only, rustic arrangements, temporary crafts | Low to mid-range |
Weight Loading: How Heavy Is a Wet Floral Cloud?
Creating a suspended floral cloud is an exercise in structural engineering where underestimating weight can have catastrophic consequences. The two components of your calculation are the « dead load » (the weight of the armature itself) and the « live load » (the flowers and foliage). The live load is the tricky part, because a fully hydrated flower is significantly heavier than a dry one. A single large hydrangea head, for example, can feel light in your hand, but once it has absorbed water, its weight increases dramatically. In fact, professional florists calculate that a fully hydrated large bloom can add up to 0.5 lbs (225g). Now, multiply that by the hundreds of stems in a typical floral cloud.
A 6-foot (2-meter) floral cloud can easily contain 50-100 lbs (23-45 kg) of wet floral material. Your armature must not only support this weight without sagging but also be light enough to comply with the venue’s rigging point load limits. This is where your choice of armature material becomes critical. Chicken wire is economical but can sag under heavy, wet loads. A welded rebar grid is incredibly strong but is itself very heavy, adding significantly to the total weight. For most overhead work, heavy-gauge aluminum wire offers the best strength-to-weight ratio. It’s lightweight, reducing the dead load, but strong enough to create a rigid framework that won’t deform under the live load of the wet flowers.
This comparative analysis, drawn from data on sustainable mechanics, highlights the trade-offs involved in selecting an armature material for heavy-load applications, as detailed by sources like the Philadelphia Floral Guild.
| Armature Material | Weight Profile | Structural Strength | Flexibility | Cost Efficiency | Best Application |
|---|---|---|---|---|---|
| Chicken Wire | Heavy when wet – prone to sagging | Moderate – adequate for standard designs | High – easily moldable | Very economical | Opaque vessels, standard centerpieces, reusable mechanics |
| Welded Rebar Grid | Very heavy – substantial weight load | Extremely strong – no sagging | Low – rigid structure | Mid-range upfront cost | Large-scale installations, permanent structures, high load-bearing needs |
| Heavy-Gauge Aluminum Wire | Lightweight – minimal added weight | Strong – excellent load distribution | Moderate – holds shape well | Higher cost per project | Overhead clouds, suspended installations, venues with load restrictions |
| Wet Straw in Chicken Wire | Lighter than foam when hydrated | Adequate – supports medium-weight designs | Moderate with cage support | Very economical and compostable | Meadow installs, ground-level designs, eco-conscious events |
Taping and Wiring: How to Put a Single Orchid Head in a Wedding Bouquet?
Wiring a Phalaenopsis orchid is the floral equivalent of performing microsurgery. These blooms are expensive, delicate, and unforgiving of clumsy hands. Unlike a sturdy rose, you cannot simply pierce the base. The key is to create an artificial stem using a method that is both secure and virtually invisible, while also providing a micro-hydration source to keep the bloom fresh.
The most advanced technique is the « invisible stitch. » This requires a very fine wire (26 or 28-gauge). Instead of piercing the fleshy petals or center, you carefully « stitch » the wire through the firm column at the very back of the orchid. This part is surprisingly tough and provides a secure anchor point without damaging the visible parts of the flower. For an extra level of care, a tiny tuft of cotton wool, soaked in water and then squeezed out, can be placed at the base of the orchid before it is sealed with stretched Parafilm. This creates a miniature water source that can extend the life of the bloom for several crucial hours during a wedding.
These specialized techniques are essential for high-value flowers:
- Invisible Stitch: Use a fine 26-28 gauge wire. Carefully pass it through the firm column at the back of a Phalaenopsis orchid for a secure, hidden anchor.
- Micro-Hydration: Before wiring, place a small, damp piece of cotton wool at the orchid’s base and seal it with Parafilm. This is critical for boutonnières and bouquets.
- Hairpin Method: For other delicate orchids, bend a 24-gauge wire into a hairpin, thread it through the center, and pull until the curve is embedded before taping.
- Stem Support: For Cymbidium orchids with short stems, run a wire alongside the existing stem and spiral-wrap them together with tape, reinforcing rather than replacing it.
This level of detailed work is what defines a luxury floral designer. It shows a deep respect for the materials and a commitment to perfection that clients can see and appreciate.
Key Takeaways
- Floral wiring is a structural skill; understanding load, tension, and material properties is more important than memorizing gauge numbers.
- Foam-free mechanics, using wire armatures, are not only sustainable but also offer superior structural integrity and creative freedom for modern designs.
- Safety and finish are paramount. Techniques like the « hook and return » and choosing rust-proof wire are non-negotiable marks of professionalism.
How to Engineer Gravity-Defying Floral Clouds for Marquee Weddings?
Engineering a large-scale suspended installation, like a floral cloud for a marquee, is the ultimate test of a floral designer’s skills. This is where you transition fully from florist to structural engineer and project manager. The artistry is a given, but success and safety hinge on logistics, calculation, and rigorous planning. Your beautiful design is irrelevant if the venue’s ceiling can’t support its weight or if it violates fire codes. The work begins long before the first flower is touched, with a thorough site survey.
A key innovation for managing these large projects is modular construction. Instead of trying to build a massive 20-foot armature on-site on the day of the wedding, you pre-fabricate smaller, manageable sections in your studio. This approach, championed by designers like Tobey Nelson, has numerous advantages. Sections can be transported in standard vehicles, assembled on-site by a smaller team, and allow for a much more controlled and efficient installation process. A framework built from interlocking chicken wire or aluminum wire sections is not only efficient but also highly sustainable, as the components can be disassembled and reused for countless future events.
Case Study: The ‘Mr. Gorgeous Monster’ Methodology
Tobey Nelson’s large-scale installation for a workshop demonstrated the power of modular armatures. The massive design was built in the studio as interlocking sections of chicken wire. This allowed the entire structure to be transported easily and assembled quickly on-site by a small team. Critically, the mechanics from that one workshop have been continuously reused for numerous weddings and events, proving the economic and environmental viability of building with reusable, modular wire systems. This case validates that pre-fabrication drastically reduces on-site installation time while ensuring structural integrity for ambitious suspended designs.
This level of planning separates designers who can create beautiful table arrangements from those who can transform entire spaces. It requires a mindset focused on safety, efficiency, and the hidden engineering that makes the magic possible. Before you even quote for such a job, a detailed checklist is your most important tool.
Your Pre-Installation Venue Survey Checklist
- Rigging Point Approval: Identify and get written confirmation from venue management on all approved structural points rated for overhead load-bearing.
- Load-Bearing Limits: Obtain technical specifications from the marquee or venue provider for the maximum weight per rigging point and total ceiling capacity.
- Fire Regulation Compliance: Verify local fire marshal requirements for overhead décor, including material approvals and necessary clearance distances from lights and exits.
- Power & Equipment Access: Map electrical outlets for lifts and tools, and plan safe cord routing. Confirm lift access dimensions and floor protection requirements.
- Key Contact Information: Secure a direct, on-site contact number for the venue/rental company representative who will be available during your entire setup window.
Now that you understand the principles from a single stem to a full-scale installation, the next step is to apply this engineering mindset to every design you create. Begin by evaluating the mechanics of your next arrangement, not as an afterthought, but as the foundational first step.