Success in commercial floristry is not subjective art; it is objective engineering based on immutable geometric and physical principles.
- Traditional Western arrangements rely on mathematical ratios (like 3:5:8 and 1.5:1) for internal and external proportion, ensuring visual harmony and replicability.
- Structural integrity is paramount, achieved by placing the focal point low and central to create a stable center of gravity, a non-negotiable for commercial work.
Recommendation: Approach every design as a technical problem to be solved with precision. Master the ‘why’ behind each rule, not just the ‘what’, to pass any examination and excel professionally.
In the world of floral design, particularly when preparing for a formal qualification like the City & Guilds, you will find that ambiguity is your greatest enemy. You may have been told to “create balance” or “make it look harmonious,” but such feedback is subjective and, frankly, useless in an examination setting. A judge is not looking for your artistic interpretation; they are looking for your technical execution of established principles. The common advice often misses the fundamental point: traditional Western floristry is less about abstract art and more about applied science. It’s a discipline built on geometry, physics, and a predictable understanding of visual psychology.
This is where many students falter. They treat a Symmetrical Triangle as a loose suggestion rather than a precise geometric form. They place a focal point where it “looks nice” without understanding its function in establishing the arrangement’s center of gravity. This guide will correct that. We will abandon vague notions of “beauty” and adopt the mindset of an engineer—or, more accurately, a strict floral judge. The true key to mastering these forms lies not in simply following the rules, but in understanding the structural and visual logic that underpins them. This is not about stifling creativity; it is about building the technical foundation upon which true creative mastery can later be built.
In this guide, we will dissect the core principles of Western geometric design with the precision you will be expected to demonstrate. We will explore the mathematical ratios that govern proportion, the physics of creating a stable focal point, and the techniques for achieving geometric perfection in forms from the Biedermeier dome to the altar-ready Symmetrical Triangle. Prepare to have your methods scrutinized and refined.
Contents: A Breakdown of Geometric Principles
- Symmetrical Triangle: The 3-5-8 Rule for Perfect Proportions
- The Biedermeier Dome: How to Achieve a Perfect Hemisphere?
- Focal Point Placement: Why Lower Center Is the Traditional Sweet Spot?
- Massed Designs: How to Use Flowers to Create Blocks of Color?
- Bud to Bloom: Why Place Buds at the Top and Full Blooms at the Base?
- The 1.5 Rule: How Tall Should the Flowers Be Relative to the Vase?
- The Bullseye Effect: How to Arrange Flowers in Perfect Rings?
- The Symmetrical Triangle: A Step-by-Step Guide for Altar Arrangements
Symmetrical Triangle: The 3-5-8 Rule for Perfect Proportions
The Symmetrical Triangle is not an abstract shape; it is a precise geometric construction. Its internal harmony is governed by a mathematical principle, not by guesswork. The 3-5-8 rule, derived directly from the Fibonacci sequence, is the cornerstone of this design’s proportions. This rule dictates the relative quantities or visual weight of the materials used. For example, you might use three main line flowers to establish the primary axes, five secondary flowers to fill out the form, and eight smaller filler flowers or foliage clusters to complete the density. This is not just an aesthetic suggestion; it is a formula for creating visual balance that feels intentional and correct.
In a commercial setting, this principle transcends theory and becomes a practical tool for production. As noted in an analysis of European design methods, the 3:5:8 proportional relationship ensures arrangements feel naturally balanced and is used for creating repeatable recipes. This allows a floral business to produce consistent products at scale, guaranteeing that every arrangement meets the same standard of quality and visual balance. For an exam, applying this rule demonstrates your understanding of both design theory and commercial viability.
The relationship between these numbers (approximating the Golden Ratio of 1.618) creates a composition that the human eye instinctively perceives as harmonious. You are engineering a predictable visual response. The height, width, and depth of your triangular arrangement should also reflect these ratios to create a cohesive whole. Ignoring this foundational rule results in a design that looks amateurish and unbalanced, an immediate red flag for any examiner.
The Biedermeier Dome: How to Achieve a Perfect Hemisphere?
The Biedermeier style is the epitome of geometric precision in floristry. It is a tightly controlled, dome-shaped arrangement characterized by concentric rings of flowers. Achieving a perfect hemisphere is not a matter of chance; it requires a strict mechanical approach. There is no room for “organic” or “flowy” interpretation here. The objective is a flawless, man-made form. Any deviation from the hemispherical shape or the concentricity of the rings constitutes a failure in execution.
A classic, if less common today, technique for building the perfect armature is the wet-sand method. This approach forces the designer to create a perfect guide before a single stem is placed. The steps are methodical and unforgiving:
- Mound dry sand into the desired hemisphere shape on top of your vessel. This is your template; it must be perfect.
- Create a small well in the top and pour water until the sand is uniformly moist. Do not flood it. The sand should hold its shape firmly.
- Establish a guide row. This could be a single line of flowers from the base to the center or an ‘X’ pattern across the top to define the arrangement’s quadrants and peak.
- Begin arranging the outermost, bottom ring first, typically with larger flower heads. Proceed inward and upward with progressively smaller blooms for each concentric ring.
- Maintain the moisture of the sand by gently adding water every few days, ensuring the structural integrity of your base.
This technique, while old, teaches a valuable lesson in armature and planning. Whether you use sand or modern floral foam, the principle is the same: you must build your design upon a geometrically perfect foundation.
As seen in the detailed view above, each ring must be distinct and uniform. The flowers should be packed tightly in a pavé technique to create a solid, textured surface. There should be no visible mechanics. The final result must be a testament to control and precision, a perfect hemisphere of color and texture.
Focal Point Placement: Why Lower Center Is the Traditional Sweet Spot?
The focal point, or area of dominance, is the visual entry point of your arrangement. It is the first place the eye is drawn. As defined by floristry educators, this principle is about creating a clear visual hierarchy. As Bloom College Australia states in their guide:
Dominance is often referred to as a focal point, an area within the arrangement that the eye is the first drawn to.
– Bloom College Australia, Elements & Principles of Design in Relation to Floristry
However, in traditional Western design, the placement of this point is not an arbitrary artistic choice. Placing the focal point low and central in the arrangement is a rule dictated by physics. This “sweet spot” serves two critical functions: establishing visual balance and ensuring physical stability. Visually, a low focal point acts as an anchor, giving the design a sense of weight and permanence. It prevents the arrangement from feeling top-heavy and precarious.
Case Study: The Physics of Focal Point Placement
An analysis in Florists’ Review highlights that professional design education treats balance as both a visual and physical challenge. A low, central focal point—often created using the largest, darkest, or most unique flowers—literally lowers the arrangement’s center of gravity. This principle of using physical weight distribution to prevent arrangements from toppling is not just theory; it is a structural necessity. For large-scale commercial designs, which must withstand transport and display, a high center of gravity is a recipe for disaster. A properly placed focal point ensures the design has structural integrity from its core.
Therefore, when a judge examines your work, they are assessing whether you have created a stable structure. A focal point placed too high suggests a fundamental misunderstanding of mechanics. You achieve this low, central dominance by grouping your most visually “heavy” flowers at the base, typically just above the lip of the container. This creates a solid foundation from which the rest of the design can emerge.
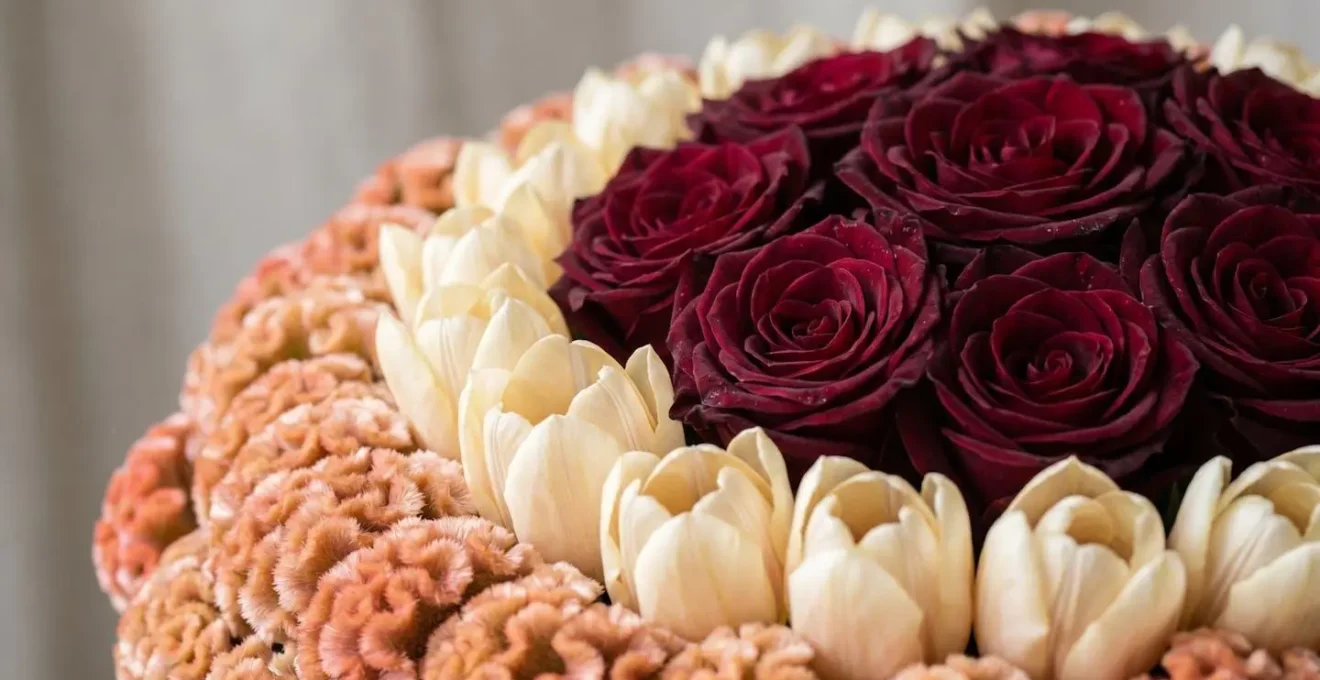
Massed Designs: How to Use Flowers to Create Blocks of Color?
Massing is a technique of using large quantities of a single type of flower or foliage to create a solid block of color and texture. This is not about simply grouping flowers together; it is a deliberate method for creating bold, graphic impact. In massed designs, the individual flower loses its identity and becomes part of a larger, unified surface. The goal is to create a strong visual statement through sheer volume and cohesive texture.
The effectiveness of a massed design depends on uniformity. You must use flowers of a consistent size, shape, and color to achieve a smooth, uninterrupted block. Any variation will disrupt the graphic effect and make the design look patchy and unfinished. This technique is often used in contemporary and large-scale installations where the arrangement functions more as a piece of sculpture or architecture than as a traditional bouquet.
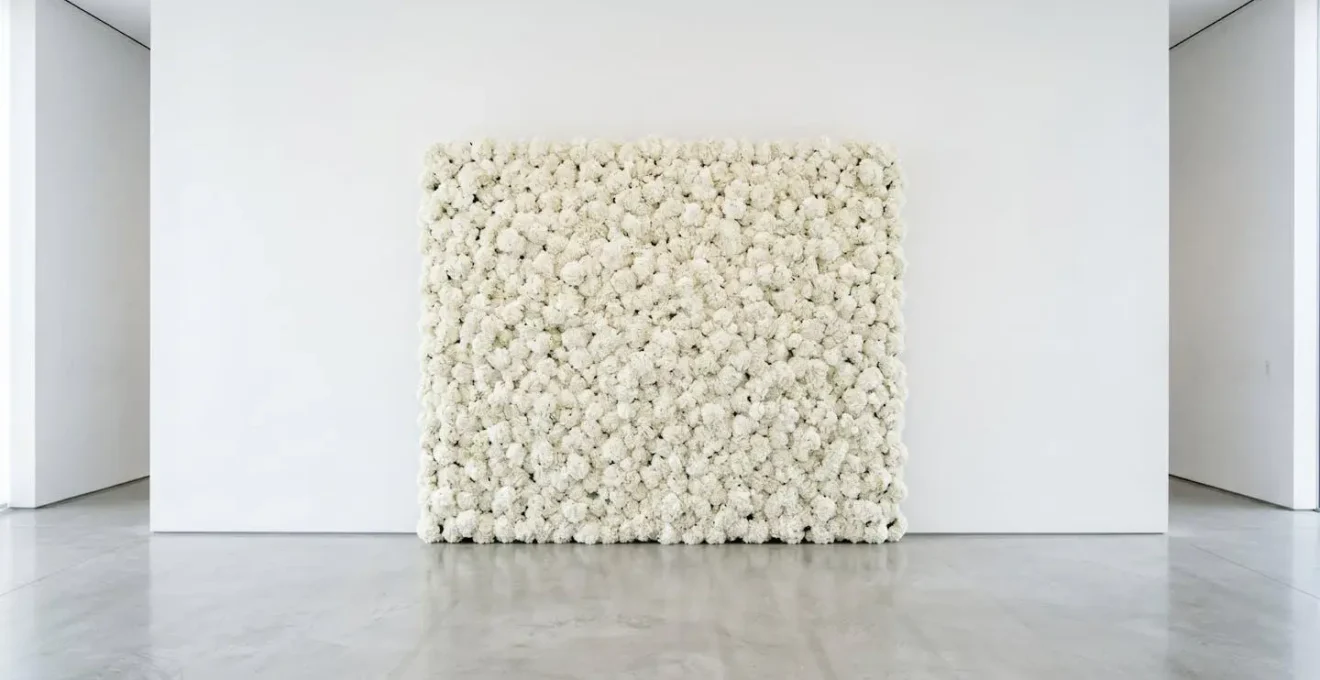
As the installation above demonstrates, when executed correctly, massing creates a powerful and dramatic effect. The wall of white hydrangeas reads as a single, textured surface. This is the power of the technique: turning hundreds of small elements into one monumental statement. In your own work, this means placing stems so closely together that no mechanics are visible, creating a dense and solid form. It requires patience and a significant quantity of material, but the result is a clean, modern, and impactful design that showcases a command of form over detail.
A common mistake is to be too sparse with the material. This creates gaps and reveals the underlying mechanics, completely destroying the illusion of a solid block. You must be prepared to use enough product to achieve complete density. A successful massed design is a study in texture, form, and the power of monochromatic or analogous color schemes.
Bud to Bloom: Why Place Buds at the Top and Full Blooms at the Base?
The strategic placement of flowers according to their stage of development, from tight buds to fully open blooms, is a fundamental principle for creating dynamism and visual logic in an arrangement. The rule is simple and absolute: place the smallest, tightest buds at the highest and outermost points of the design, and gradually transition to the largest, most fully open blooms at the base, near the focal point. This is not an arbitrary aesthetic choice; it is a technique that leverages principles of visual weight and natural growth patterns.
Visually, tight buds are lighter and appear smaller, lending an airy, delicate quality to the extremities of the arrangement. They create a sense of aspiration and draw the eye upward. In contrast, large, open blooms are visually heavy. Placing them low in the design helps to anchor the arrangement, reinforcing the low center of gravity established by the focal point. This creates a structure that is both physically and visually stable. Reversing this order—placing heavy blooms at the top—results in a precarious, top-heavy design that looks like it could topple at any moment.
Furthermore, this technique creates a sense of life and rhythm. It mimics the natural growth pattern of a plant, where new growth reaches for the light and older, larger blooms sit lower on the stem. As one analysis of design principles notes, this method taps into our subconscious understanding of plant growth, making arrangements feel organic and dynamic. You are essentially engineering a sense of naturalism and vitality within a highly structured geometric form. An arrangement that follows this rule feels alive, while one that ignores it feels static and artificial. For a judge, this demonstrates a sophisticated understanding of how to guide the viewer’s eye and imbue a formal design with a sense of energy.
The 1.5 Rule: How Tall Should the Flowers Be Relative to the Vase?
Proportion is the most fundamental principle in floral design, and the relationship between the plant material and the container is the most critical proportion to master. The “1.5 Rule” is the non-negotiable industry standard for establishing this relationship in traditional vertical arrangements. The rule states that the height of the floral arrangement should be 1.5 times the height of the container. If you are using a low bowl, the arrangement should be 1.5 times the width of the container.
This is not a loose guideline; it is a precise mathematical ratio that creates a pleasing and stable visual balance. According to established industry standards that establish a 1.5:1 ratio for vertical arrangements, this proportion prevents the design from looking either stunted (if too short) or unstable (if too tall). It is the baseline for professional-grade work. An arrangement that is twice the height of its vase will look precarious and poorly planned. One that is the same height as its vase will appear squat and clumsy.
This rule is a practical application of the Golden Ratio (approximately 1.618), a proportion found throughout nature that the human eye finds intrinsically beautiful. By adhering to the 1.5 Rule, you are creating a composition that is mathematically harmonious. In an examination, a ruler may literally be used to check your proportions. You must measure your container and calculate the final height of your arrangement before you make your first cut. Your highest point, typically the tip of your main line flower, must hit that 1.5 mark. There is no room for error here; it is a pass-or-fail measurement of your technical discipline.
The Bullseye Effect: How to Arrange Flowers in Perfect Rings?
The “Bullseye” or concentric ring style, most famously seen in Biedermeier designs, is a test of pure geometric precision. The goal is to create flawless, distinct rings of color or texture, radiating from a central point. The effect should be clean, graphic, and perfectly circular. This requires meticulous planning and mechanical control, as any imperfection in the rings is immediately obvious, especially when viewed from above.
Achieving this level of precision is impossible without establishing clear guides before you begin. Freehanding the rings will result in ovals and wobbles. A disciplined florist uses mechanical aids to ensure geometric perfection. You must score or press guidelines directly into your floral foam to create an unerring path for your stems. This is not cheating; it is professional practice.
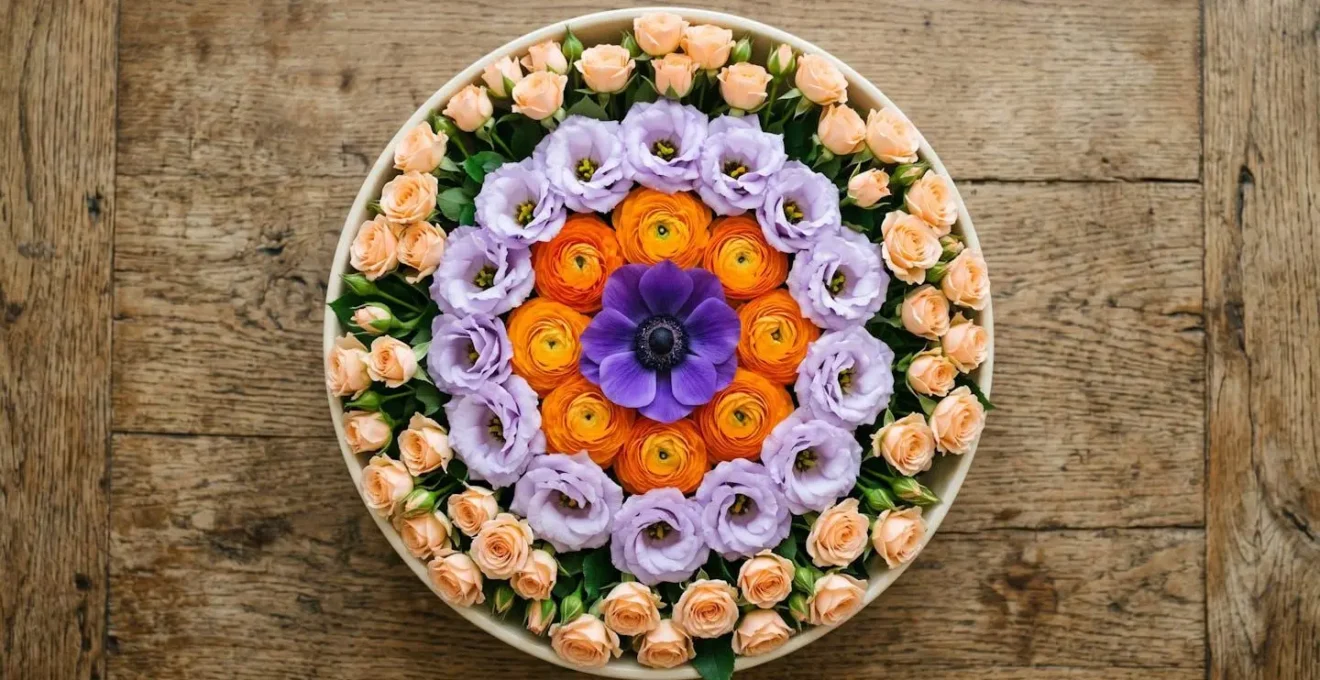
As the top-down view illustrates, the power of the bullseye effect comes from its perfect geometry and the crisp definition between each ring. Each flower head must be placed at a uniform height to create a flat, pavé-like surface, and each ring must be perfectly circular. To achieve this, you must rotate the arrangement constantly as you work, checking your lines from all angles. This is a slow, methodical process that rewards discipline over speed.
Action Plan for Geometric Precision in Ring Designs
- Create Guides: Use a compass to score perfect concentric circles into your floral foam before starting. Alternatively, use different-sized circular objects like cans or lids to press guide rings into the foam surface. These are your non-negotiable blueprints.
- Establish Symmetry: Create an ‘X’ guide with your first four stems, spanning the arrangement from edge to edge through the center. This establishes symmetry for the top-down view.
- Work Methodically: Begin with the outermost ring and work your way inward. This helps maintain clean lines between each band of color or texture.
- Maintain a Uniform Surface: Ensure each flower head within a ring sits at a uniform height. For a domed Biedermeier, this height will change with each ring, but for a flat-topped bullseye, it must be consistent.
- Rotate and Verify: Continuously rotate the arrangement as you work. Step back and view it from above. This is the only way to ensure your rings remain perfectly circular and not distorted.
Key Takeaways
- Geometric precision is not optional; it is the foundation of Western floral design, governed by mathematical rules like 1.5:1 and 3:5:8.
- Structural integrity is paramount. A low, central focal point creates a stable center of gravity, a non-negotiable for professional, transportable arrangements.
- Mastering formal techniques requires understanding the ‘why’—the physics of balance and the psychology of visual hierarchy—not just memorizing the ‘what’.
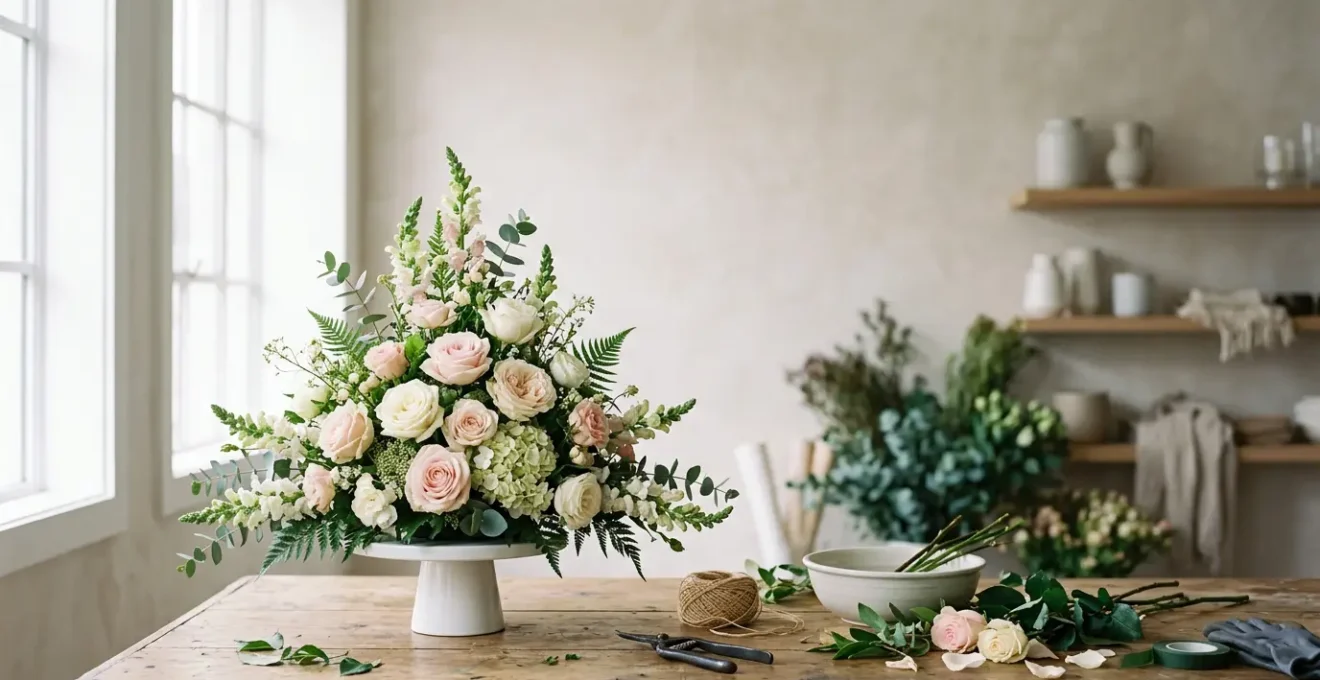
The Symmetrical Triangle: A Step-by-Step Guide for Altar Arrangements
Mastering large-scale arrangements like the Symmetrical Triangle for an altar is not merely an academic exercise; it is a direct line to significant commercial opportunities. The ability to create large, stable, and visually impressive pieces for events, weddings, and places of worship is a highly valuable skill. In a market demonstrating robust growth, where the commercial floristry sector shows strong potential with a projected 8.0% CAGR through 2030, proficiency in these foundational, large-scale designs is essential for a successful career.
An altar arrangement must be impressive from a distance and perfectly balanced. The Symmetrical Triangle is a classic choice for its inherent stability and formal grace. Here is a step-by-step guide to its construction, assuming a large vessel and floral foam as the mechanic.
- Establish Your Proportions: Before anything else, measure your container. Your highest point (A) must be at least 1.5 times the container’s height. The two lowest side points (B and C) will define the width. Ensure the final shape will be an isosceles triangle.
- Create the Skeleton: Insert the first and tallest stem (A) vertically into the center of the foam. Insert the two side stems (B and C) horizontally or slightly angled down at the sides. Finally, insert a short stem at the front-center (D) to establish depth. You now have the five points of a 3D triangle.
- Place the Focal Point: Select your largest, boldest, or darkest flowers. Place them low and centrally, right above the container’s lip and around point D. This is your visual and physical anchor. All other flowers will radiate from this point.
- Fill in the Lines: Using secondary flowers, fill in the lines of the triangle from the focal point out to points A, B, and C. Follow the “bud-to-bloom” rule, with smaller flowers and buds toward the tips and more open flowers closer to the center.
- Add Mass and Hide Mechanics: Use your filler flowers and foliage to fill the space within the triangle’s skeleton. Work from the inside out. Ensure all foam and mechanics are completely hidden. The final design should appear full and dense, but still retain its crisp triangular outline. Rotate the design as you work to ensure it is balanced from all sides.
An altar piece is a public-facing design that must hold up to scrutiny. Every stem must have a purpose, every line must be clean, and the overall structure must be impeccably stable and symmetrical. This is where all the principles—proportion, balance, focal point, and rhythm—come together in a final, comprehensive test of your skill.
To succeed, you must apply these geometric and physical principles with unwavering discipline. Practice not until you get it right, but until you cannot get it wrong. That is the standard required for professional qualification and the foundation of a successful career in commercial floristry.