Controlling tulips isn’t about fighting their droop with myths like pin-pricks; it’s about mastering the plant’s internal biology.
- Post-harvest growth is driven by water-fueled cell elongation, a manageable process, not an unstoppable urge.
- Airlocks (embolisms) are real, but they’re fixed by proper cutting and hydration techniques, not by wounding the stem.
Recommendation: Master the principles of hydraulic conductance and cellular mechanics to turn the dynamic movement of tulips from a frustration into a deliberate design element.
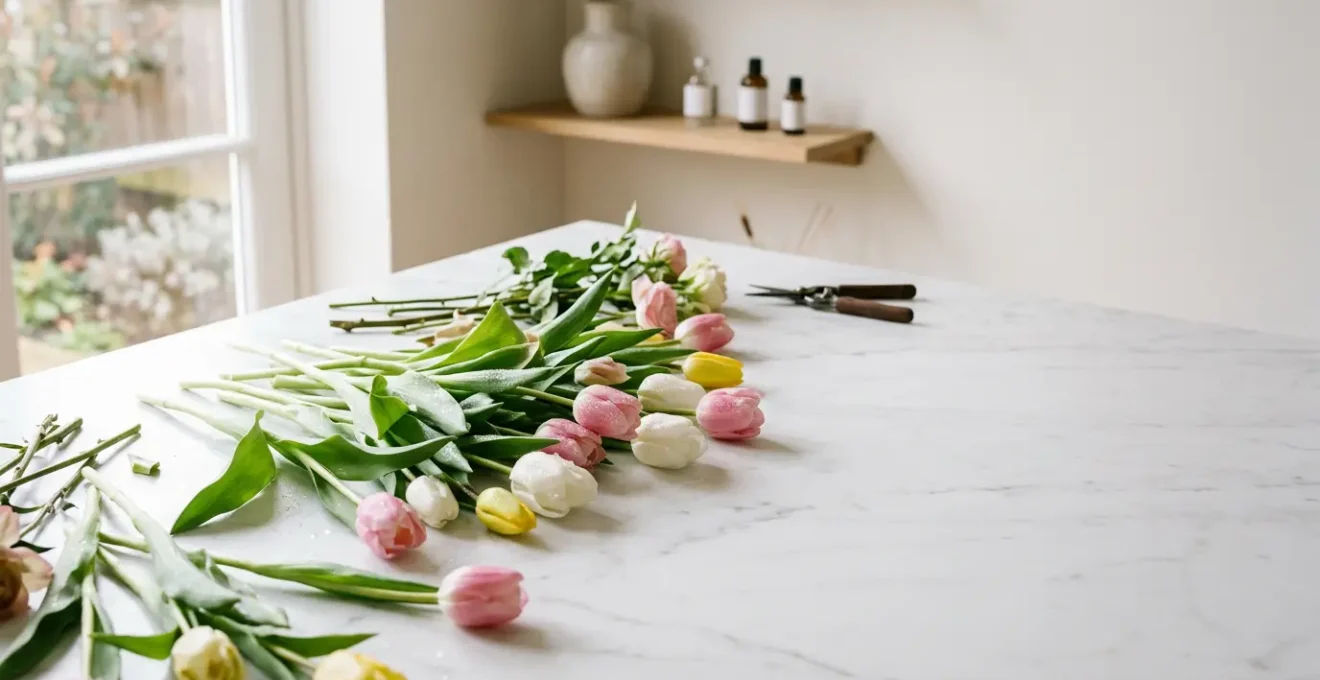
There is a unique frustration known to every florist: the perfectly placed tulip arrangement, crisp and upright one evening, transformed into a sprawling, languid dance by morning. You’ve followed the rules—a fresh cut, clean water, a cool room—yet the tulips have continued their journey, growing, bending, and seemingly following a choreography all their own. This dynamic nature is often seen as a flaw, a problem to be conquered with a litany of folk remedies and half-understood tricks passed down through the industry.
Many of the common suggestions, from adding a penny to the water to the ubiquitous pin-prick below the flower head, treat the symptoms rather than the cause. They address the “what” without ever explaining the “why.” But what if the key to mastering tulips wasn’t in fighting their nature, but in understanding it? What if their movement could be predicted, guided, and even used as a powerful element in your floral designs? The secret lies not in a magic trick, but in the botany of the flower itself.
This guide moves beyond the myths to explore the science that governs a tulip’s life after cutting. We will dissect the mechanisms of its growth, its interactions with other flowers, and the real causes of drooping and wilting. By understanding the tulip as a living, breathing machine, you will gain the expert control needed to transform its movement from an annoyance into an art form. This is not about stopping tulips from being tulips; it’s about learning to speak their botanical language.
To help you navigate this deep dive into tulip mechanics, this article breaks down the science into actionable insights. The following sections cover everything from cellular growth to advanced conditioning techniques, providing a comprehensive toolkit for any professional working with this popular yet perplexing flower.
Summary: Tulipmania: Mastering the Movement of Spring’s Most Popular Flower
- The Inch-a-Day Rule: How Much Will Your Tulips Grow After Cutting?
- Tulips and Daffodils: Why Narcissus Sap Kills Tulips and How to Fix It?
- Massaging Stems: How to Curve a Tulip Stem Without Snapping It?
- Bulb-On Design: How to Display Tulips with Roots in Glass?
- Reflexed Tulips: How to Turn a Tulip Inside Out for a New Look?
- Xylem and Phloem: Why Blunt Scissors Kill Flowers by Crushing Tubes?
- Pin Pricking Tulips: Does It Release Air or Just Damage the Stem?
- How to Prevent and Clear Airlocks in Cut Flower Stems?
The Inch-a-Day Rule: How Much Will Your Tulips Grow After Cutting?
The observation that tulips continue to grow in the vase is not an illusion; it’s a measurable botanical phenomenon. This post-harvest growth is one of the most defining characteristics of the tulip as a cut flower. Unlike most other flowers that simply maintain their size, tulips can elongate significantly, altering the structure of your arrangement day by day. The rate of growth can be surprisingly rapid, with some cultivars growing as much as an inch or more. In fact, scientific research shows that tulips can grow from 1.3 to 2.5 centimeters per day even after being cut.
This growth is not a sign that the flower is trying to reach for light (phototropism), although that happens too. The primary driver is a process called cell elongation. The cells in the upper part of the stem, just below the flower, are programmed for this final growth spurt. When the stem is placed in water, these cells act like tiny hydraulic pumps, absorbing water and swelling. This hydraulic pressure physically stretches the cell walls, pushing the stem longer and the flower higher.
As botanical researchers at Thursd explain, this is a continuation of the flower’s natural life cycle. The process is so ingrained that it persists long after the bulb has been left behind. Understanding this mechanism is the first step to managing it. While you can’t stop it entirely without starving the flower, you can account for it in your designs by either giving the tulips room to grow or by selecting shorter stems to begin with, knowing they will soon catch up.
Tulips and Daffodils: Why Narcissus Sap Kills Tulips and How to Fix It?
A classic springtime pairing, tulips and daffodils (Narcissus), can unfortunately lead to a disastrous outcome in a mixed vase. Many florists learn the hard way that placing freshly cut daffodils with tulips results in the rapid decline and premature death of the tulips. The culprit is the thick, clear, and highly toxic mucilage—or sap—that daffodils release from their stems immediately after being cut. This sap is a defense mechanism for the daffodil but acts as a poison to many other flowers, especially tulips.
The damage caused by this sap is not merely a physical blockage of the tulip’s water-uptake system. While the sap can be a factor, the primary issue is chemical. According to a scientific study on the daffodil vase effect, the sap contains toxic alkaloids. In tulips, these compounds don’t significantly affect water uptake but instead cause “precocious leaf yellowing” and cellular death. The tulip is effectively poisoned from the inside out, leading to a swift collapse long before its natural vase life is over.
The solution requires a quarantine period. To safely use daffodils and tulips together, you must condition the daffodils separately first.
- Cut the daffodil stems to your desired length.
- Place them in a separate bucket of water for at least 6 to 12 hours. During this time, they will release the majority of their toxic sap.
- After this conditioning period, do not re-cut the daffodil stems when adding them to the arrangement. A fresh cut will trigger a new release of the harmful mucilage.
This simple but crucial step allows the stems to “seal” and makes them safe to combine with your tulips and other sensitive flowers.
Visualizing the viscous sap on the daffodil stem serves as a potent reminder of the chemical warfare happening in your vase. By isolating and neutralizing this threat before it begins, you ensure a harmonious and long-lasting arrangement for all flowers involved.
Massaging Stems: How to Curve a Tulip Stem Without Snapping It?
The natural curvature of a tulip stem, often perceived as “drooping,” can be one of its most elegant features. Rather than forcing them into rigid upright positions, an expert florist learns to work with this tendency, even enhancing it to create graceful, cascading lines. The technique involves gently “massaging” or warming the stem to make it more pliable, but this can only be done safely and effectively if the flower is properly conditioned first. An improperly hydrated stem will snap, while an over-hydrated one can be too turgid.
The key to achieving a flexible, workable stem lies in perfect hydration. A stem that is fully hydrated but not brittle has the ideal cellular structure for manipulation. The goal is to make the cells plump with water, providing a hydraulic cushion that allows the cellulose walls to bend rather than break. This is where a professional conditioning protocol becomes essential.
Before attempting to curve a stem, follow these preparatory steps:
- Rehydrate for Support: Upon receiving tulips, rehydrate them for at least 4 hours. Keep them wrapped snugly in paper or their sleeves during this time. This provides physical support, keeping the stems straight and preventing them from wilting while they drink.
- Make the Right Cut: Use a sharp knife to cut about 1 inch (2.5 cm) from the stem base, ensuring you remove any white, woody tissue that doesn’t conduct water well.
- Hold Upright: Process and condition the stems in an upright position to encourage a straight, strong starting form.
- Time the Manipulation: The perfect moment for manipulation is when the stems feel firm and cool to the touch but still have a slight “give.” They should not be floppy or rigid.
Once the stems are perfectly conditioned, you can create a curve. Hold the stem gently in your hands. The warmth of your hands will slightly increase the pliability of the cells. Slowly and gently, run your fingers along the stem, applying very light pressure in the direction you want it to curve. Do not try to force a sharp angle. Instead, encourage a gentle, sweeping arc. The flower will naturally follow the path of least resistance, allowing you to guide its shape without causing damage.
Bulb-On Design: How to Display Tulips with Roots in Glass?
An increasingly popular and wonderfully rustic approach to tulip design involves leaving the bulb and roots attached. This “bulb-on” or “forced bulb” presentation transforms the tulip from a mere cut flower into a complete botanical specimen, celebrating its entire life cycle. Displayed in a clear glass vase with their roots washed clean, these tulips offer a unique, earthy aesthetic and have the added benefit of a longer display life. By keeping the bulb—the flower’s original life support system—intact, you can extend their vase life considerably compared to a cut stem under the same conditions.
The technique is straightforward. Instead of cutting the stem, the entire plant is gently lifted from the soil or growing medium when the bud is showing full color but is not yet open. The soil is then carefully washed away from the roots, leaving the white, thread-like structures intact. Placed in a clear vase with a small amount of water just covering the roots, the tulip will continue to live, grow, and bloom, drawing sustenance from the water and the remaining energy stored in the bulb.
However, it is crucial to manage expectations for the bulb’s future. While this method creates a beautiful, long-lasting display, it is a terminal act for the bulb itself. As experts from professional cut flower farms note, the bulb expends its final energy reserves to produce the bloom.
When you cut the bloom and stem away from the bulb, the bulb has no way to photosynthesize and re-energize itself. While the bulb may produce leaves the following spring, it’s unlikely it will ever bloom again.
– Three Acre Farm, Professional cut flower growing guide
Therefore, these bulbs should be considered part of the arrangement and discarded or composted after the flower has faded. This approach is about creating a stunning, temporary ecosystem in a vase, not about cultivating a plant for future seasons. It is a powerful design choice that highlights the beauty of the entire plant, from root to petal.
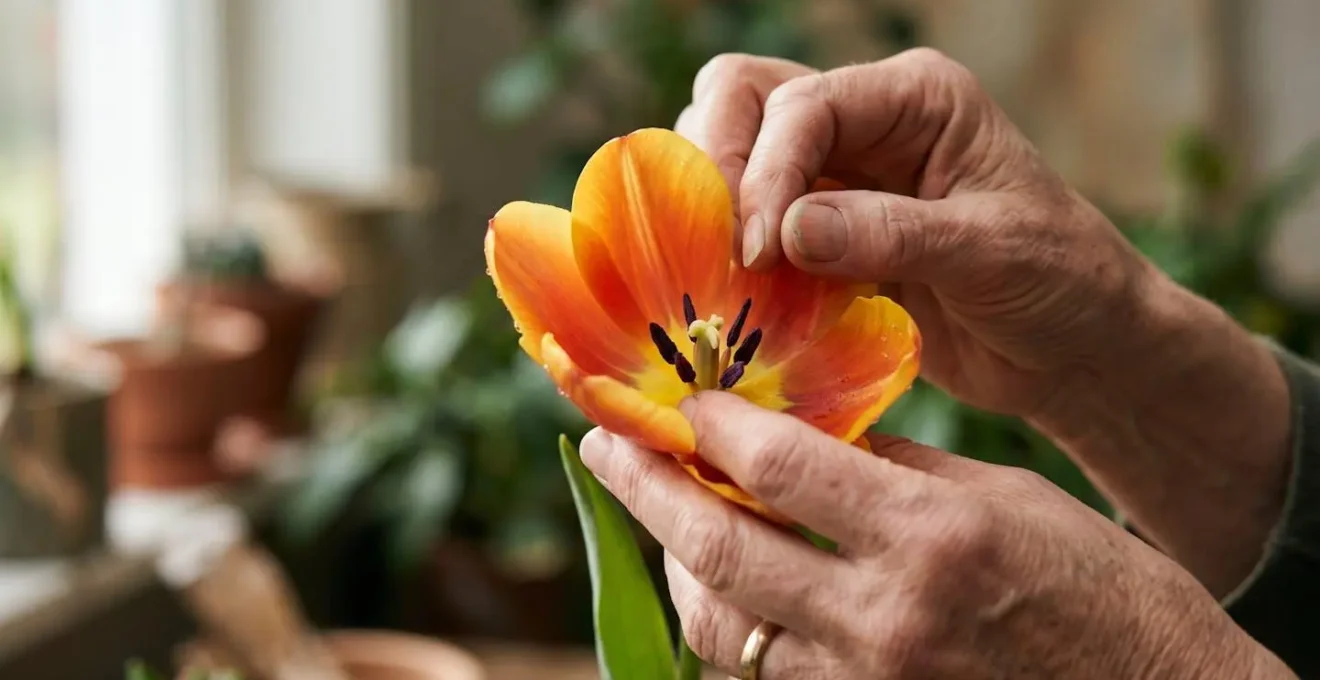
Reflexed Tulips: How to Turn a Tulip Inside Out for a New Look?
For a dramatic and high-fashion transformation, florists can “reflex” a tulip’s petals. This technique involves manually turning each petal outwards, completely altering the flower’s silhouette from a classic cup shape into a star-like, open-faced bloom. Reflexing not only makes the flower appear larger and more lush but also reveals the intricate beauty of the inner petal colors and the delicate stamen, which are usually hidden. It is a simple trick that can add a touch of couture to any arrangement and is particularly effective with Parrot or Double tulips.
The process of reflexing a tulip is delicate and requires a gentle touch. It is best performed on a tulip that is already partially open and has been fully hydrated for several hours. A thirsty flower will have flimsy petals that could tear, while a fresh, turgid one is pliable and resilient.
- Select Your Tulip: Choose a healthy, fully colored tulip that has started to open. The petals should feel supple, not brittle.
- Support the Stem: Hold the tulip head in one hand and the stem in the other, just below the base of the flower, to provide support.
- Start with Outer Petals: Locate an outer petal. Place your thumb at the base of the petal on the inside and gently fold the petal back on itself.
- Apply Gentle Pressure: Slowly and smoothly, run your thumb along the center of the petal, encouraging it to curl backward. You might hear a very faint crackle, which is normal.
- Repeat for All Petals: Continue this process, working your way around the flower, petal by petal. Move from the outer petals to the inner ones until the flower is fully opened.
A reflexed tulip is a statement. It is a flower that has been intentionally and artfully manipulated to showcase its full glory. While this technique does slightly shorten the flower’s overall vase life by increasing its rate of transpiration, the dramatic visual impact it creates is often well worth the trade-off for event work or special arrangements.
Xylem and Phloem: Why Blunt Scissors Kill Flowers by Crushing Tubes?
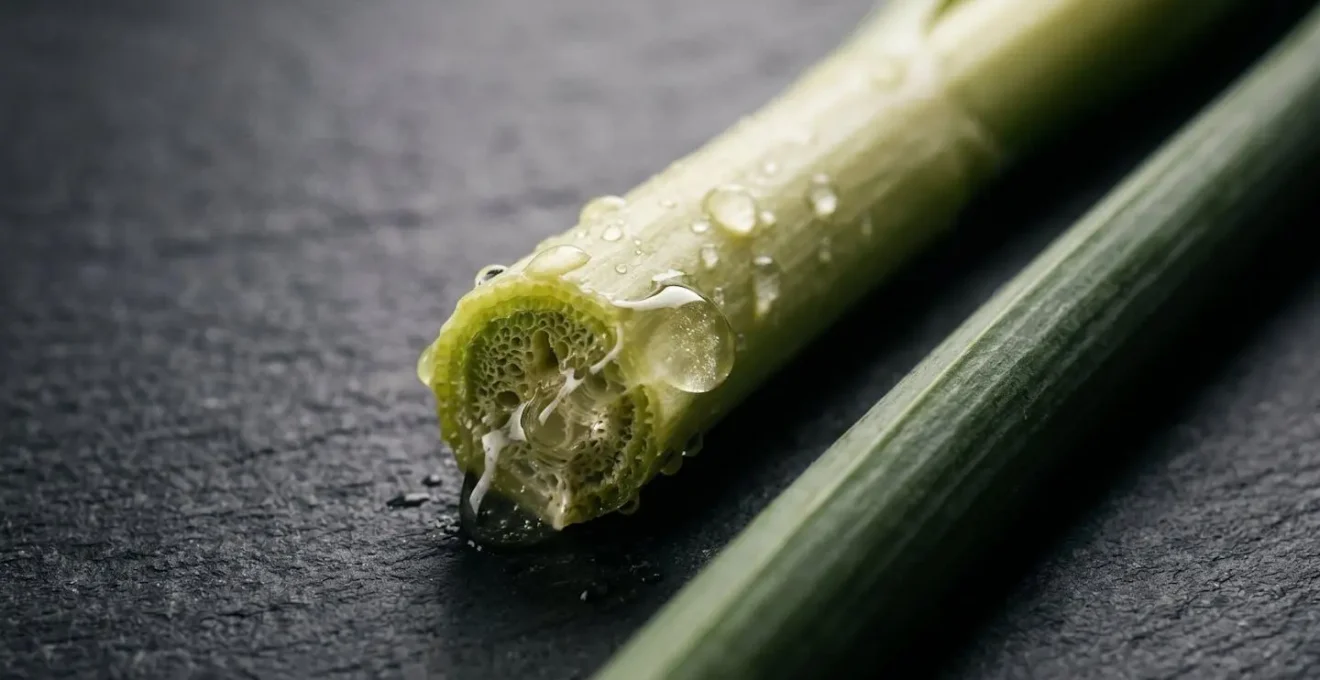
The single most important action a florist takes is cutting a stem. The quality of this cut directly determines the flower’s ability to hydrate and, therefore, its vase life. To understand why, we must look at the stem’s internal anatomy. Inside every stem is a vascular system, a network of microscopic tubes responsible for transporting water and nutrients. The most critical of these are the xylem vessels, which act like tiny straws, pulling water from the vase up to the leaves and flower head.
When you use blunt scissors, a dull knife, or any improper cutting tool, you are not making a clean slice. Instead, you are crushing the stem. This pressure collapses the delicate xylem tubes at the cut site, pinching them shut. A crushed stem is like trying to drink from a straw that has been flattened. No matter how much water is in the vase, the flower cannot drink effectively. This leads to rapid wilting, a drooping head, and a drastically shortened life, all because the vital hydraulic conductance has been compromised.
A sharp, clean cut, on the other hand, leaves the xylem tubes open and ready to absorb water. This is why professional florists exclusively use sharp floral knives or clippers designed to make a surgical-quality incision. According to guidance for professional florists, to ensure optimal water uptake, a clean cut of at least 2.5 cm (1 inch) should be made to remove the previous stem end which may be blocked or contaminated. Making this cut under water is an even better practice, as it prevents a tiny air bubble, or embolism, from being immediately drawn into the xylem as the stem is moved from air to water.
Action Plan: Auditing Your Tulip Conditioning Process
- Handling Points Audit: List every stage where tulips are handled (unpacking, stripping foliage, cutting, arranging) to identify potential points of physical stress or dehydration.
- Tool & Water Inventory: Document your current tools. Is your knife or clipper dedicated and regularly sharpened? Is your water source clean and are buckets sanitized between uses? What floral food or solution is being used?
- Procedure Check: Compare your current conditioning steps against the ideal protocol. Are you rehydrating flowers upright and wrapped? Are they placed in a cool, draft-free area?
- Symptom Analysis: Keep a log of common tulip issues you face—excessive drooping, snapped stems, premature yellowing. Try to correlate these symptoms with specific points in your handling process.
- Improvement Plan: Based on your audit, prioritize one or two changes. For example: implement a mandatory underwater re-cutting station or test a different brand of floral food specifically for bulb flowers.
Treating your cutting tools with the same respect as a surgeon treats a scalpel is not an exaggeration. It is the foundation of professional flower care and the first line of defense against premature wilting.
Pin Pricking Tulips: Does It Release Air or Just Damage the Stem?
One of the most persistent myths in floristry is the “pin-prick trick.” The advice, often given as a quick fix for drooping tulips, is to pierce the stem with a pin just below the flower head. The supposed logic is that this releases a trapped air bubble, or “airlock,” allowing water to flow freely again and the head to stand upright. While the intention is good, the science behind this practice is fundamentally flawed, and the action itself is more harmful than helpful.
The drooping in a tulip is often caused by an air bubble (an embolism) in the xylem, which does indeed block water flow. However, this is not a single, large pocket of air that can be “popped” like a balloon. As research on xylem embolism in cut flowers explains, these air blockages are microscopic and are trapped within countless individual vascular tubes.
Air emboli are microscopic and trapped within the xylem vessels, not a large pocket of air. The pinprick creates a wound for bacteria to enter without addressing the actual embolism.
– Xylem embolism researchers, Academic research on cut flower physiology
Pricking the stem does nothing to remove these microscopic blockages. What it does do is create an open wound. This wound bypasses the stem’s natural protective outer layer, creating a perfect entry point for bacteria, fungi, and other pathogens present in the air or water. The wound itself can also trigger a stress response in the plant, sometimes causing the neck to weaken further. In essence, the pin-prick “fix” introduces a new problem without solving the original one.
The temporary “straightening” that some people report after pricking a tulip is often a coincidence or a result of other factors, such as moving the flower to a cooler location or the flower’s natural geotropism (responding to gravity) kicking in. The real solution to an airlock lies not in wounding the stem, but in properly restoring its hydraulic system, a process that requires a more methodical approach.
Key takeaways
- Tulip growth after cutting is a biological process (cell elongation) that can be managed by controlling hydration, not simply stopped.
- The tool and technique used for cutting the stem are paramount; a sharp, clean cut prevents crushing the xylem, which is the root cause of most hydration failures.
- Incompatibilities (like with daffodils) and folk remedies (like pin-pricking) are best understood and solved through science (alkaloid toxicity, embolism repair) rather than guesswork.
How to Prevent and Clear Airlocks in Cut Flower Stems?
An airlock, or embolism, is the silent killer of many cut flowers. It occurs when a microscopic air bubble gets sucked into the xylem vessels at the moment of cutting, or enters later if the stem is left out of water. This bubble creates a blockage that prevents water from being drawn up the stem, leading to a drooping head and rapid wilting, even when the vase is full of water. While the pin-prick myth offers a tempting but ineffective shortcut, the correct method for preventing and clearing an embolism is based on sound hydraulic principles.
Prevention is always the best strategy. The most effective way to prevent airlocks is to make your cuts underwater. By submerging the end of the stem in a bowl of water while you cut it, you ensure that water, not air, is the first thing drawn into the freshly opened xylem tubes. This single step can dramatically improve hydration and extend vase life. Using a commercial hydration solution or floral food is also beneficial, as these products contain surfactants that reduce the surface tension of the water, making it “wetter” and more easily absorbed, which can help dislodge small embolisms.
If you suspect a flower is suffering from an airlock, you can perform an emergency repair procedure. This process is designed to remove the blockage and restore hydraulic conductance. Based on cryo-scanning electron microscopy research that visualizes the process, a full recovery can be achieved in under two hours.
- Submerge and Re-cut: Place the entire wilted stem into a basin of lukewarm water. While the stem is fully submerged, use a sharp knife to re-cut it at least one inch (2.5 cm) above the previous cut. This removes the section containing the embolism.
- Isolate and Soak: Place the re-cut stem into a separate, clean container filled with fresh, lukewarm water (and floral food, if available). The warmer temperature encourages faster water uptake.
- Allow Time for Recovery: Let the flower rest in this solution for 1.5 to 2 hours. During this time, the upward pull of water will help dissolve any remaining air from the vessels near the new cut surface.
- Return to Arrangement: Once the flower has revived and is turgid again, you can return it to your main arrangement.
This methodical approach directly addresses the physical blockage in the stem’s vascular system, providing a reliable and scientifically-backed solution to a frustrating problem.
Armed with this botanical knowledge, you can now approach every tulip not as a potential problem, but as a dynamic material. Your understanding of cell elongation, vascular systems, and chemical interactions transforms you from a flower arranger into a true flower master. Begin today by auditing your conditioning process, investing in a quality floral knife, and experimenting with the elegant dance of the tulip. By working with its nature, not against it, you will unlock a new level of artistry and longevity in your floral designs.