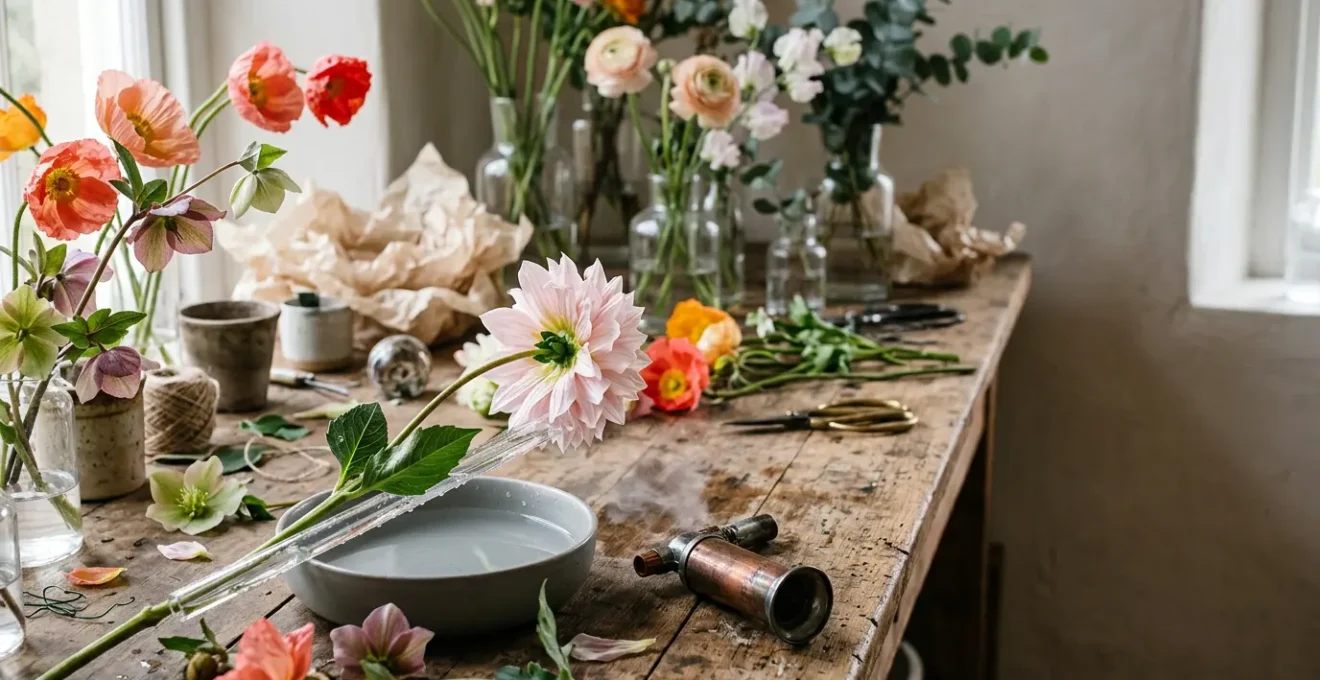
Losing high-value, delicate blooms to wilting and damage is a common frustration for grower-florists. The solution isn’t just better general care; it’s about understanding the unique physiological and mechanical weaknesses of each cultivar. This guide moves beyond basic tips to provide targeted interventions for “diva” flowers like poppies, hellebores, and dahlias, transforming your post-harvest process from a guessing game into a science-backed strategy to maximize bloom integrity and profitability.
As a grower-florist, there is no greater heartbreak than watching a perfect, high-value bloom—a crinkled poppy, a nodding hellebore, a dinner-plate dahlia—fail before it ever reaches the client. You’ve done everything right in the field, only to be defeated in the bucket. The common advice to ‘cut stems at an angle’ or ‘use flower food’ feels woefully inadequate when dealing with these horticultural divas. We’re told it’s just the cost of doing business with fragile beauties.
But what if the problem isn’t the flower’s fragility, but our approach? The key to unlocking consistent vase life in these challenging cultivars lies in moving beyond generic conditioning. It requires adopting a ‘plant-first’ mindset, diagnosing their specific self-sabotaging tendencies—from sap that clogs their own water uptake to stems too weak to support their glorious heads—and applying precise, often counter-intuitive, remedies. This isn’t just about hydration; it’s about overriding the plant’s built-in mechanical and physiological flaws.
This guide provides the targeted interventions you need, treating each flower’s problem with the specific solution it requires. We will cover searing, internal support, precise harvesting, and other professional techniques that turn frustration into reliability, ensuring every precious stem you’ve nurtured lives up to its full potential.
This article details the specific conditioning protocols for some of the most notoriously difficult but rewarding flowers in the trade. Explore the sections below to master the techniques that separate the amateur from the professional.
Summary: A Grower’s Guide to Mastering Temperamental Blooms
- Flame or Boiling Water: How to Sear Poppy Ends to Stop Sap Loss?
- Scoring the Neck: Does This Old Wives’ Tale Help Hellebores Drink?
- Dahlia Straws: How to Use Internal Support for Heavy Heads?
- Marshmallow Stage: When Exactly to Pick a Peony for Storage?
- Tissue Paper Nests: How to Pack Fragile Blooms for Delivery?
- Milky Sap: How to Treat Euphorbia Stems to Stop Them Clogging Others?
- The Blow: How to Encourage a Tight Rose to Open Fully for the Event?
- The Garden Rose Guide: Varieties, Care, and Styling for Weddings
Flame or Boiling Water: How to Sear Poppy Ends to Stop Sap Loss?
The tragic, rapid wilt of a beautiful poppy is a prime example of physiological sabotage. When cut, poppy stems bleed a milky latex sap. This sap doesn’t just make a mess; it quickly congeals upon contact with air and water, effectively forming a plug that blocks the xylem—the flower’s water-uptake channels. No amount of fresh water or flower food can get past this barrier, leading to swift dehydration and a drooping head. The flower is literally starving in a bucket full of water.
The solution is not to avoid poppies, but to apply a targeted intervention: cauterization. By searing the cut end of the stem with either a flame or boiling water, you instantly seal the wound. This stops the sap from leaking and clogging the stem, allowing the flower to hydrate properly. This simple, aggressive-sounding step is the non-negotiable secret to achieving a vase life of up to 5 days for Iceland poppies when properly treated. It’s a crucial step that transforms them from an ephemeral risk into a reliable product.
Your Action Plan: Perfect Poppy Conditioning
- Cut poppy stems at the colored bud stage or just as they open, before bees pollinate them.
- Choose your method: Use an open flame (torch or lighter) to sear the cut stem for 7-10 seconds, or dip the bottom inch into boiling water for the same duration.
- Immediately plunge the seared stems into a bucket of cool, fresh water with flower food to start hydration.
- If you need to recut the stems for arranging, you must repeat the searing process to re-seal the cut.
- This process ensures the prevention of sap leakage and maintains consistent water uptake for the life of the bloom.
This technique is the difference between a poppy that lasts for hours and one that lasts for days, making it a foundational skill for any serious grower-florist.
Scoring the Neck: Does This Old Wives’ Tale Help Hellebores Drink?
The dreaded hellebore droop is the bane of many designers. A common “old wives’ tale” suggests scoring or slitting the stem to improve water uptake. This is not only ineffective but can actually damage the stem’s structure. The primary reason hellebores wilt is not a lack of surface area for drinking, but air bubbles trapped in the stem—an embolism—that block the flow of water. Hellebores are particularly prone to this issue, especially if they are not conditioned immediately after harvest.
The professional solution directly targets this air-lock problem. As expert sources explain, the most effective method is a quick hot water treatment.
Dipping the bottom inch of the stems in boiling water for 20-30 seconds effectively forces out trapped air bubbles, clearing the path for water absorption.
– Professional floristry sources, The Floral Coach – Hellebore Care Guide
For a hellebore that has already wilted dramatically, a more intensive revival method is needed. Fully submerging the entire flower and stem in a basin of cool water for several hours can often bring it back to life. This allows the bloom to absorb water through its petals and leaves, bypassing the blocked stem entirely and restoring turgor pressure.
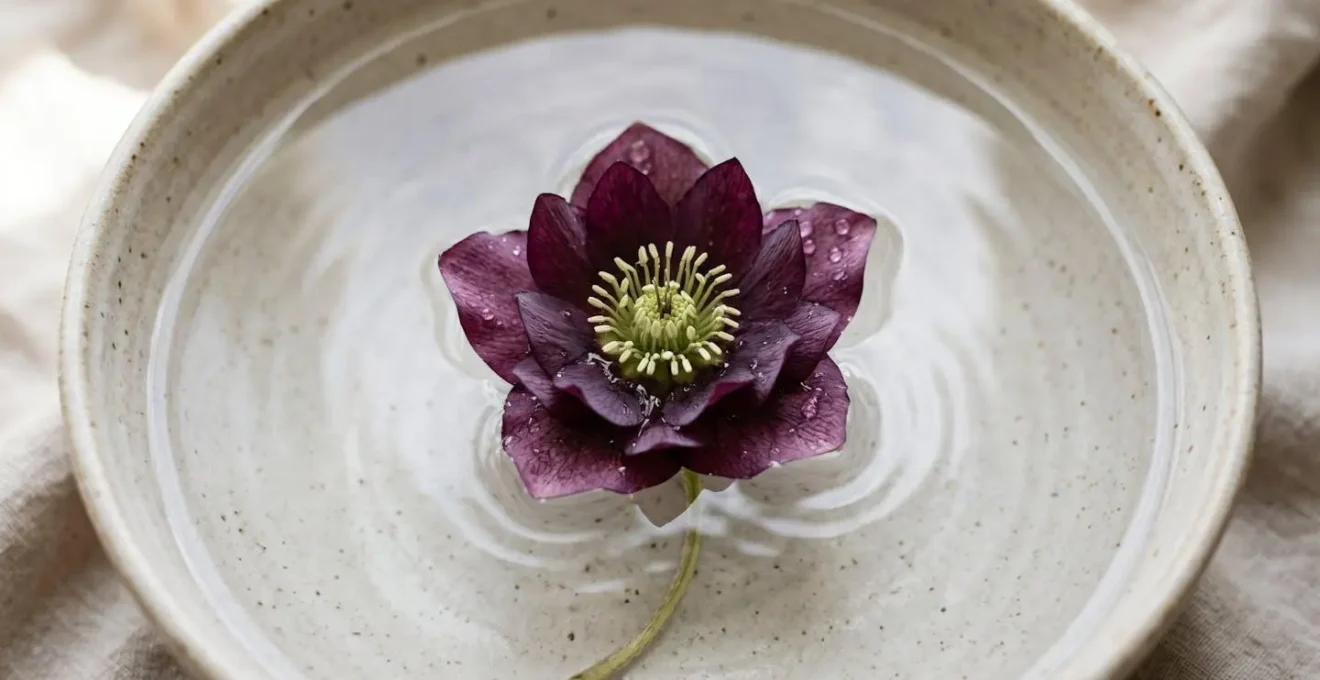
This full-submersion technique is an emergency measure, but it’s remarkably effective. It highlights that with hellebores, the challenge is less about getting water *in* and more about getting air *out* of the way. Forget the scoring; focus on clearing the pathway.
By addressing the real issue of air embolisms, you can transform hellebores from a risky inclusion to a reliable and elegant star of your arrangements.
Dahlia Straws: How to Use Internal Support for Heavy Heads?
Dinner-plate dahlias are a spectacular crop, but their grandeur is also their greatest weakness. The combination of a massive, water-heavy head and a hollow, relatively soft stem creates a significant risk of mechanical failure. The stem simply cannot support the weight of the bloom, leading to bent necks and broken heads, often right before a major event. This is a structural engineering problem, and it requires a structural solution.
The concept of “dahlia straws” refers to the practice of inserting a supportive material inside the hollow stem to act as an internal skeleton. This provides the rigidity needed to keep the heavy bloom upright and secure. While a simple drinking straw is a common quick fix, professionals have a range of materials at their disposal, each with specific pros and cons for different situations, from event work to daily bouquets. The key is to choose the right material to create an ‘endoskeleton’ that preserves the bloom’s integrity without compromising its natural grace.
This comparative analysis shows the different options available to a grower-florist for providing internal support. A recent comparative analysis breaks down the choices:
| Support Material | Pros | Cons | Best Use Case |
|---|---|---|---|
| Plastic Straws | Flexible, inexpensive, widely available, easy to insert | Non-biodegradable, visible if arrangement is transparent | Emergency support for drooping heads in existing arrangements |
| Wooden Skewers | Rigid support, biodegradable, natural aesthetic | Can develop mold in water, may be too stiff for curved stems | Preventative support during initial conditioning for dinner-plate varieties |
| Thick Floral Wire | Reusable, very strong, adjustable length | Can rust over time, requires careful insertion to avoid stem damage | Professional event work requiring long-lasting structural integrity |
By proactively addressing this mechanical flaw, you can confidently use your most impressive dahlia specimens, knowing they are fortified against their own weight.
Marshmallow Stage: When Exactly to Pick a Peony for Storage?
For a grower-florist, peonies represent a significant opportunity for profit, but only if their harvest is timed with absolute precision. Unlike flowers picked for immediate use, peonies destined for cold storage must be harvested at a very specific point of development. Picked too early, in a “rock hard” state, and they will never open. Picked too late, when they are already soft and showing color, and their storage life is drastically reduced. The perfect moment is known in the trade as the “soft marshmallow” stage.
This isn’t a visual cue alone; it’s a tactile one. At this ideal stage, a gentle squeeze of the bud should feel exactly like a fresh marshmallow—soft and yielding, but not spongy. This indicates the flower has enough stored energy to open beautifully in the vase after being revived from cold storage, but is still dormant enough to last for weeks, or even months, when properly wrapped and chilled. Mastering this tactile assessment is a core skill for extending the peony season and maximizing the value of every single stem.
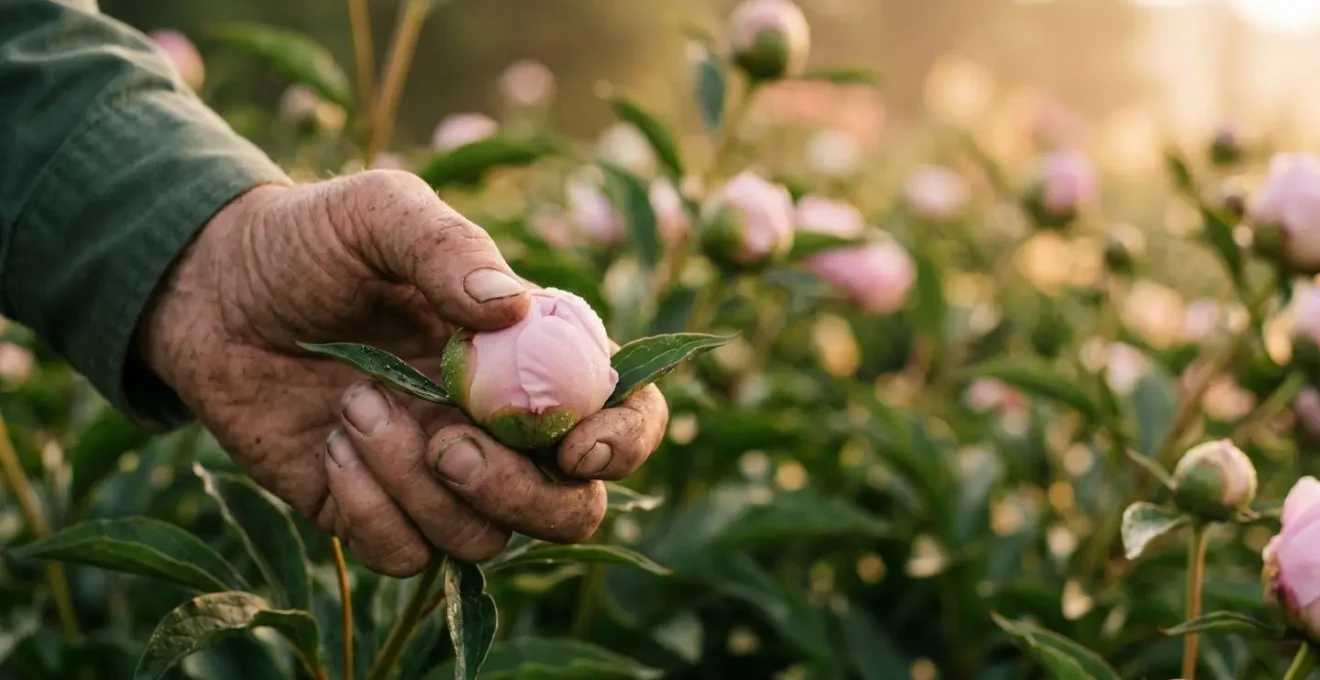
This hands-on evaluation is more reliable than judging by color or size alone. The difference between a ‘rock hard’ bud and a ‘soft marshmallow’ one can be a matter of hours in the field, making daily checks essential during peak season.
- Stage 1 – ‘Rock Hard’: The bud feels rigid, like a marble. Sepals are tight. This is too early and the bud will not open in the vase.
- Stage 2 – ‘Soft Marshmallow’ (IDEAL): The bud yields to gentle pressure. Sepals are pulling away, showing color. This is the perfect stage for long-term dry storage (3-4 weeks).
- Stage 3 – ‘Spongy/Giving’: The bud is very soft, petals are visible. This is best for immediate use as it will open within 24-48 hours. It is too late for extended storage.
This precise harvesting is not just about a longer vase life; it’s a fundamental business strategy for managing inventory and meeting demand outside of the natural blooming window.
Tissue Paper Nests: How to Pack Fragile Blooms for Delivery?
The job isn’t done when the flower is perfectly conditioned; it’s done when it arrives in the client’s hands looking exactly as it did in your workshop. The final journey is often the most perilous, especially for blooms with delicate petals like ranunculus, cosmos, or garden roses. Simple bunching and wrapping is a recipe for disaster, leading to bruised petals, broken necks, and a loss of bloom integrity. Professional packing is a science of cushioning and moisture management.
The use of “tissue paper nests” is a key technique. By individually creating a soft, supportive cushion around each fragile bloom or small cluster, you achieve several goals at once. You prevent petal-on-petal friction, which causes bruising. You absorb any impacts during transport. And you help wick away excess moisture from condensation, which can lead to botrytis (gray mold). This level of care is a critical final step in professional flower handling, ensuring the quality you cultivated is preserved all the way to the end user.
Mississippi State Extension Professional Florist Packing Protocol
The Professional Florist’s Manual from Mississippi State University Extension outlines three critical goals for packing delicate blooms: (1) creating a cushioned nest to absorb impact during transport, (2) preventing petal-on-petal friction that causes bruising, and (3) managing moisture through wicking materials to prevent botrytis (gray mold) from condensation. The manual emphasizes that proper packing transforms each design from workshop to recipient while maintaining the exact same appearance, making it a critical final step in professional flower handling.
Temperature control during transit is another critical factor. While hardy flowers can withstand cooler temperatures, some delicate blooms have specific thresholds. For example, tropical flowers like orchids and anthurium begin to suffer at temperatures below 40°F (4.4°C), a crucial detail to know if they’re part of a mixed delivery.
Proper packing isn’t an afterthought; it’s the final, crucial act of quality control that protects your work, your reputation, and your bottom line.
Milky Sap: How to Treat Euphorbia Stems to Stop Them Clogging Others?
Much like poppies, many species of Euphorbia (Spurge) exude a milky white latex sap when cut. However, the problem with Euphorbia is twofold. First, it engages in the same act of physiological sabotage, clogging its own stem and preventing hydration. Second, and more critically for a florist, this sap is often toxic or irritating to other flowers. If an untreated Euphorbia stem is placed in a bucket or vase with other flowers, the leaching sap can contaminate the water and drastically shorten the vase life of everything else in the arrangement.
Furthermore, this sap presents a personal safety risk. It is a known skin and eye irritant, making proper handling a matter of workplace safety, not just flower care.
Euphorbia sap is a significant skin and eye irritant. Wear gloves and avoid touching your face when handling, framing this not just as flower care but as personal safety.
– Professional Floristry Safety Guidelines, Industry best practices for latex-producing plants
To neutralize this double threat, the sap flow must be stopped immediately after cutting. As with poppies, searing is the most effective method. However, for large-batch processing, an alternative exists. The choice between methods often comes down to workflow efficiency versus speed, as outlined in this comparison from an analysis of sap treatment methods.
| Method | Technique | Duration | When to Use |
|---|---|---|---|
| Searing (A) | Apply open flame or dip in boiling water to seal cut end | 7-10 seconds | Immediate processing; when speed is essential; prevents both stem clogging and water contamination instantly |
| Cold Water Bleed (B) | Let cut stems sit in separate bucket of cold water to allow sap to leach out | 30-60 minutes | When processing large batches; allows passive treatment while working on other tasks; less risk of over-charring |
Isolating and treating Euphorbia stems upon harvest is a non-negotiable step to ensure the longevity of all your flowers and your own personal safety.
The Blow: How to Encourage a Tight Rose to Open Fully for the Event?
You have a wedding in two hours and a bucket of expensive garden roses that are still stubbornly tight. This is a high-pressure scenario familiar to every event florist. Forcing a rose to open is a delicate balance; you need to encourage it, not damage it. The infamous technique of blowing into the center of the rose—”the blow”—is often seen on social media, but it should be considered a method of last resort. It risks introducing moisture and bacteria directly into the heart of the bloom, which can lead to brown spots (botrytis) and a shortened vase life.
A true professional relies on a hierarchy of safer, more reliable techniques first, working with the rose’s natural tendencies. The goal is to simulate the conditions that encourage a rose to open on its own accord—namely, warmth and hydration. Shifting the environment is the first and most effective step. Only when time is critically short and safer methods have failed should more aggressive, hands-on techniques be considered.
Here are the proven techniques, ranked from most reliable and safest to the riskiest last resort:
- Warm Water & Environment Shift: Place tight roses in warm (not hot) water and move them to a warmer, brighter room. This is the most natural and least damaging method to encourage opening over a few hours.
- Reflexing Guard Petals: The tough, often greenish outer “guard” petals can physically constrain the bud. Gently bending these petals backward can release the pressure and allow the inner bloom to unfurl.
- Stem Rolling: Gently rolling the stem back and forth between your palms helps to stimulate water flow up the stem, encouraging the head to open.
- The Blow (Last Resort): Gently blow warm, dry air into the center of the rose. This is a high-risk maneuver and should only be used in an emergency, as it can introduce moisture and bacteria.
By starting with the gentlest methods first, you can often achieve the desired openness without compromising the health and longevity of the bloom.
Key Takeaways
- Specific problems require specific solutions: searing for sap, internal supports for weak stems, and precise harvest timing for storage.
- Understanding the ‘why’ behind a flower’s failure (e.g., air embolisms in hellebores) is key to applying the correct remedy.
- Post-harvest care is a science of managing mechanical flaws, physiological quirks, and environmental factors to maximize bloom integrity and profitability.
The Garden Rose Guide: Varieties, Care, and Styling for Weddings
The garden rose, particularly high-petal-count varieties like those from David Austin, represents the pinnacle of floral luxury—and the ultimate test of a grower-florist’s skill. Their delicate, paper-thin petals, soft structure, and dense form make them both breathtakingly beautiful and exceptionally susceptible to damage and disease. More than any other flower, a perfect garden rose at a wedding is a testament to meticulous care at every single stage, from harvest to final placement.
All the principles we’ve discussed—managing hydration, preventing mechanical damage, and controlling the environment—culminate in the handling of these blooms. Their high petal count creates a perfect microclimate for botrytis, making moisture management the single most critical factor. The slightest condensation can lead to petal blight, ruining the flower. This is why professionals recommend a 4+ hours minimum hydration period after processing, allowing the rose to fully firm up in a controlled, dry-air environment before being handled for design work.
Botrytis Management in High-Petal-Count Garden Roses
Garden roses are highly susceptible to botrytis (petal blight), a fungal disease creating brown spots activated by moisture. Professional florists have identified key preventative protocols: never store roses with wet heads, ensure good air circulation, and immediately remove any spotted petals to prevent spore spread. The high petal count that makes garden roses desirable also creates the perfect microclimate for fungal growth, making moisture management the single most important care factor for wedding work.
Successfully providing flawless garden roses for an event is not a matter of luck. It is the direct result of applying a rigorous, science-based conditioning process that respects the unique vulnerabilities of the cultivar. It’s about protecting your investment and delivering on the promise of perfection that these iconic flowers represent.
By implementing these advanced conditioning strategies, you can shift from hoping your delicate cultivars will last to engineering their success. This is how you reduce waste, build a reputation for quality, and ultimately, grow a more profitable and sustainable flower business.